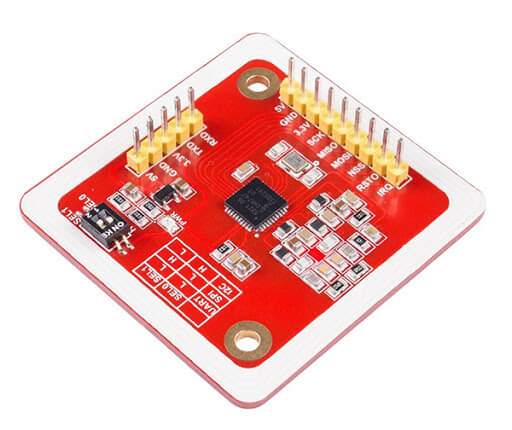
El módulo NFC PN532 es un lector de tarjetas inteligentes que, entre otras cosas, activa un mecanismo cuando se presenta la tarjeta correcta al lector. Se puede encontrar en los smartphones, por ejemplo. El módulo RC522 es sin duda el módulo RFID más conocido en el mundo de Arduino, pero en este tutorial veremos cómo utilizar el lector RFID PN532, que tiene ciertas ventajas, sobre todo en cuanto a las opciones de comunicación. Veremos aquí cómo utilizar el módulo según los diferentes métodos de comunicación UART, SPI, I2C.
Material
- Ordenador
- Arduino UNO
- Cable USB A Macho/B Macho
- Módulo NFC PN532
- Cable Dupont M/F
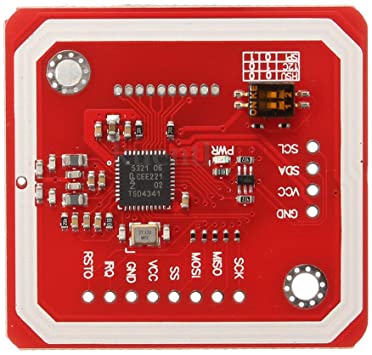
Selección del modo de comunicación
Una de las grandes ventajas del módulo NFC es que puede utilizar diferentes protocolos para comunicarse con Arduino, UART, I2C o SPI. Estos diferentes protocolos utilizan pines y librerías específicas del microcontrolador.
Para seleccionar el modo de comunicación, el PN532 debe configurarse mediante los interruptores DIP (0-Bajo, 1-Alto):
| SEL0 | SEL1 | |
| UART | 0 | 0 |
| SPI | 0 | 1 |
| I2C | 1 | 0 |
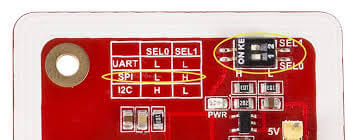
Asegúrese de que los ajustes de los interruptores DIP coinciden con los diagramas de cableado.
Utilización del módulo con la comunicación en serie
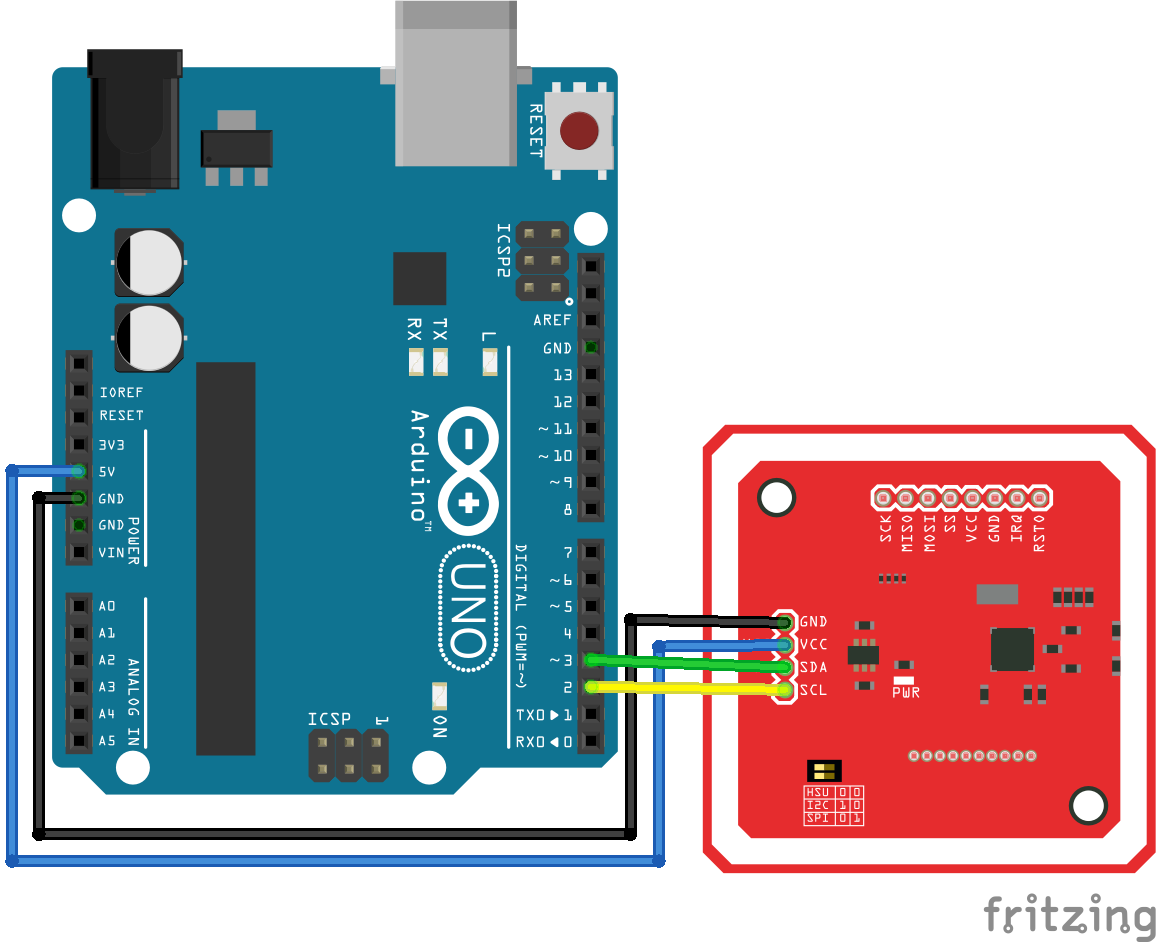
Esquema
Para la comunicación en serie o UART, el pinout es el siguiente (lado izquierdo PN532, lado derecho Arduino UNO):
- Vcc (Alimentación) <-> 5V
- GND (Tierra) <-> GND
- Rx (Receive line) <-> Tx
- Tx (Transmit line) <-> Rx
Código
Como hay diferentes opciones de comunicación, hay que utilizar la biblioteca adecuada en cada caso. En el caso de un puerto UART, PN532_HSU.h , para un puerto SoftwareSerial, PN532_SWHSU.h . Las funciones que permiten la lectura NFC siguen siendo idénticas en cada caso.
// for Hardware Serial
/*#include <PN532_HSU.h>
  #include <PN532.h>
  PN532_HSU pn532hsu( Serial );
  PN532 nfc( pn532hsu );
*/

// for Software Serial
#include <SoftwareSerial.h>
#include <PN532_SWHSU.h>
#include <PN532.h>
SoftwareSerial SWSerial( 2, 3 ); // RX, TX
PN532_SWHSU pn532swhsu( SWSerial );
PN532 nfc( pn532swhsu );


String tagId = "None", dispTag = "None";
byte nuidPICC[4];

void setup(void) {

  Serial.begin(115200);
  Serial.println("Hello Maker!");
  //  Serial2.begin(115200, SERIAL_8N1, RXD2, TXD2);

  nfc.begin();

  uint32_t versiondata = nfc.getFirmwareVersion();
  if (! versiondata) {
    Serial.print("Didn't Find PN53x Module");
    while (1); // Halt
  }

  // Got valid data, print it out!
  Serial.print("Found chip PN5"); Serial.println((versiondata >> 24) & 0xFF, HEX);
  Serial.print("Firmware ver. "); Serial.print((versiondata >> 16) & 0xFF, DEC);
  Serial.print('.'); Serial.println((versiondata >> 8) & 0xFF, DEC);

  // Configure board to read RFID tags
  nfc.SAMConfig();

  Serial.println("Waiting for an ISO14443A Card ...");

}

void loop() {
  readNFC();
}

void readNFC() {

  boolean success;
  uint8_t uid[] = { 0, 0, 0, 0, 0, 0, 0 };  // Buffer to store the returned UID
  uint8_t uidLength;                       // Length of the UID (4 or 7 bytes depending on ISO14443A card type)
  success = nfc.readPassiveTargetID(PN532_MIFARE_ISO14443A, &uid[0], &uidLength);

  if (success) {
    Serial.print("UID Length: "); Serial.print(uidLength, DEC); Serial.println(" bytes");
    Serial.print("UID Value: ");

    for (uint8_t i = 0; i < uidLength; i++) {
      nuidPICC[i] = uid[i];
      Serial.print(" "); Serial.print(uid[i], DEC);
    }
    Serial.println();
    tagId = tagToString(nuidPICC);
    dispTag = tagId;
    Serial.print(F("tagId is : "));
    Serial.println(tagId);
    Serial.println("");

    delay(1000);  // 1 second halt

  } else {
    // PN532 probably timed out waiting for a card
    //Serial.println("Timed out! Waiting for a card...");
  }
}

String tagToString(byte id[4]) {
  String tagId = "";
  for (byte i = 0; i < 4; i++) {
    if (i < 3) tagId += String(id[i]) + ".";
    else tagId += String(id[i]);
  }
  return tagId;
}
Uso del módulo con I2C
Equema
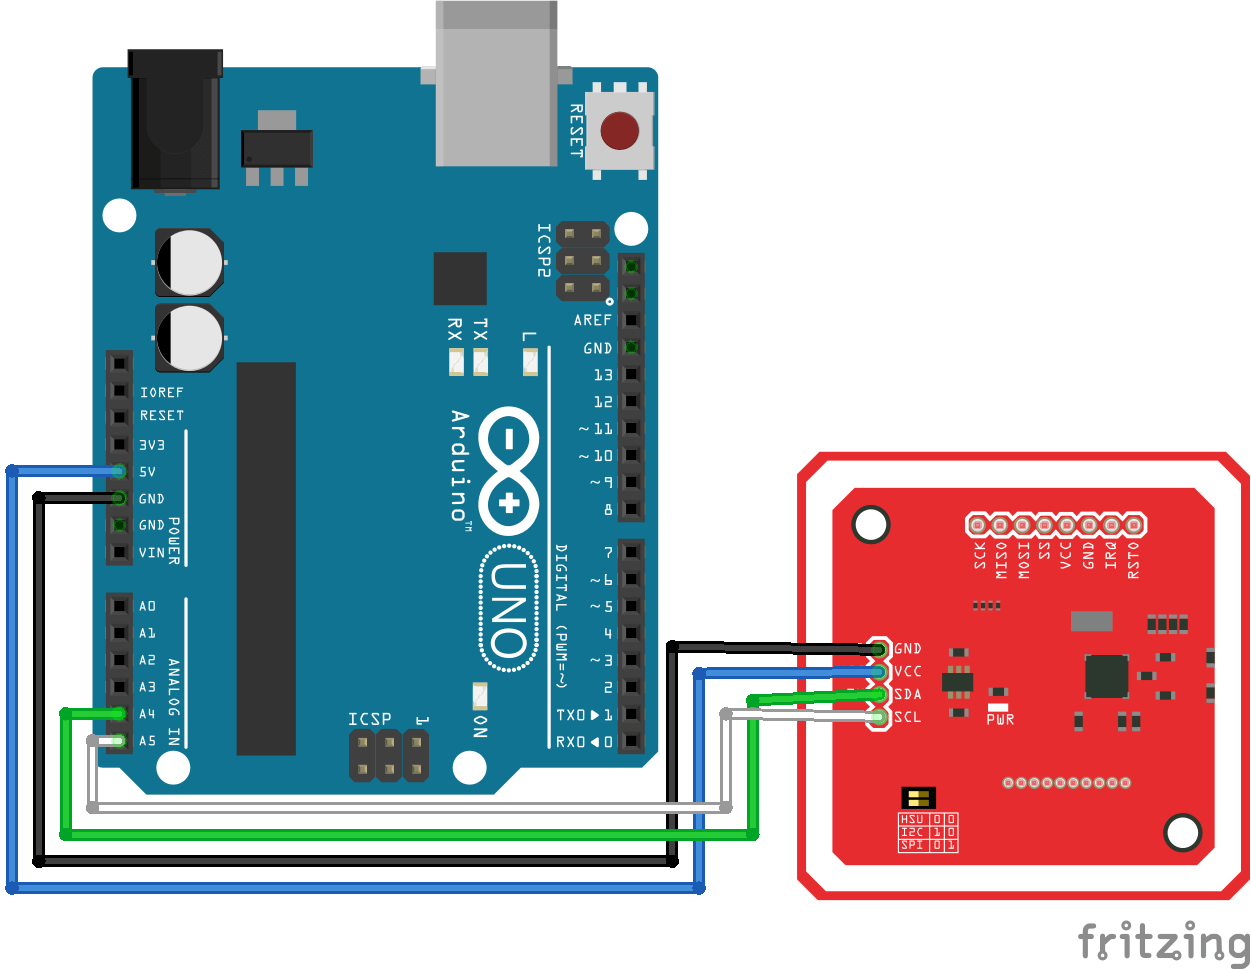
Para la comunicación I2C, el pinout es el siguiente:
- Vcc (Alimentation) <-> 5V
- Vcc (Alimentación) <-> 5V
- GND (Tierra) <-> GND
- SDA (Datos) <-> A4
- SCL (Reloj) <-> A5
Código para la comunicación I2C
La biblioteca PN532_I2C.h para la comunicación I2C
// for I2C Communication
#include <Wire.h>
#include <PN532_I2C.h>
#include <PN532.h>
#include <NfcAdapter.h>
PN532_I2C pn532_i2c(Wire);
NfcAdapter nfc = NfcAdapter(pn532_i2c);

String tagId = "None";
byte nuidPICC[4];

void setup(void) {
  Serial.begin(115200);
  Serial.println("System initialized");

  nfc.begin();
}

void loop() {
  readNFC();
}

void readNFC() {
  if (nfc.tagPresent())
  {
    NfcTag tag = nfc.read();
    tag.print();
    tagId = tag.getUidString();
  }
  delay(5000);
}
Uso del módulo con SPI
Esquema
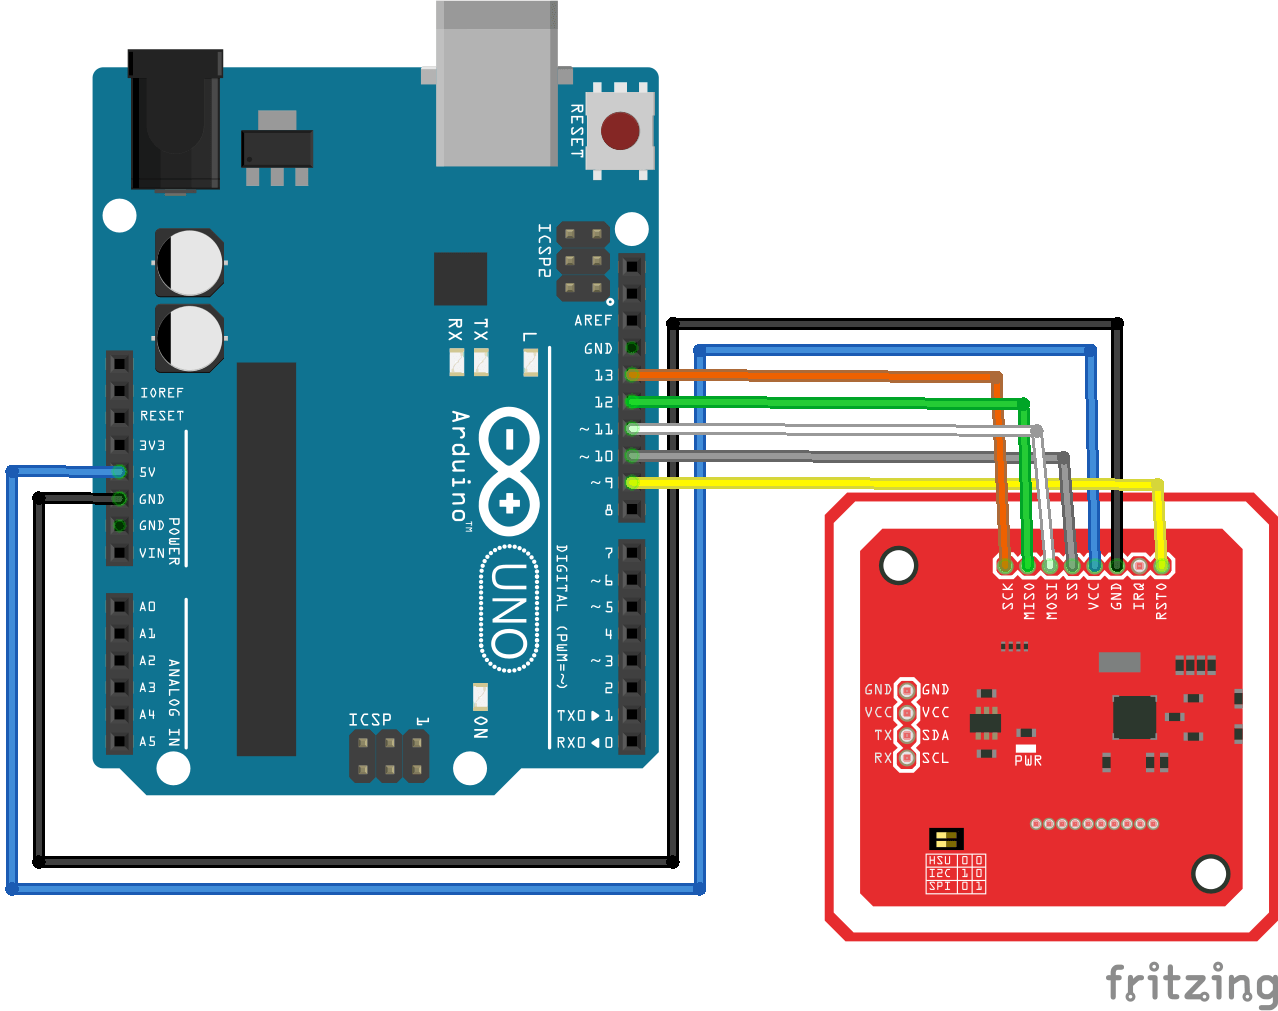
Para la comunicación SPI, El pinout es el siguiente:
- Vcc (Alimentation) <-> 5V/3V3
- Vcc (Alimentación) <-> 5V/3V3
- RST (Reset) <-> 9
- GND (Tierra) <-> GND
- MISO (Master Input Slave Output) <-> 11
- MOSI (Salida maestra Entrada esclava) <-> 12
- SCK (Serial Clock) <-> 13
- SS (Slave select) <-> 10
Código para la comunicación SPI
PN532_SPI.h para la comunicación a través del puerto SPI.
// for SPI Communication
#include <SPI.h>
#include <PN532_SPI.h>
#include <PN532.h>
#include <NfcAdapter.h>
PN532_SPI interface(SPI, 10); // create a PN532 SPI interface with the SPI CS terminal located at digital pin 10
NfcAdapter nfc = NfcAdapter(interface); // create an NFC adapter object


String tagId = "None";

void setup(void) {
  Serial.begin(115200);
  Serial.println("System initialized");

  nfc.begin();
}

void loop() {
  readNFC();
}

void readNFC() {
  if (nfc.tagPresent())
  {
    NfcTag tag = nfc.read();
    tag.print();
    tagId = tag.getUidString();
  }
  delay(5000);
}
Aplicaciones
- Apertura de la cerradura de la tarjeta magnética
Fuentes
- https://github.com/elechouse/PN532
- https://github.com/elechouse/PN532/tree/PN532_HSU/PN532_HSU
- https://github.com/elechouse/PN532/tree/PN532_HSU/PN532_SWHSU
- https://github.com/elechouse/PN532/tree/PN532_HSU/PN532_SPI
- https://github.com/elechouse/PN532/tree/PN532_HSU/PN532_I2C
- https://github.com/elechouse/PN532/tree/PN532_HSU/NDEF
- https://www.arduino.cc/en/reference/wire
- https://www.arduino.cc/en/reference/SPI
Retrouvez nos tutoriels et d’autres exemples dans notre générateur automatique de code
La Programmerie
