Le module open-source OpenCV est un outil puissant de traitement d’image contenant des algorithmes de vision par ordinateur. Ce module est codé nativement en C++ mais une API est disponible sur Python. On l’utilise pour le traitement d’image, photo comme vidéo et l’entraînement d’intelligence artificielle de reconnaissance visuelle.
Installation et configuration de Python
Si ce n’est pas déjà fait, installer Python et configurer vos variables d’environnement
Installer la librairie opencv
python -m pip install opencv-pythonN.B.: Il peut être intéressant de créer un environnement virtuel car les algorithmes n’utilisent pas les mêmes librairies d’OpenCV. L’important est de n’en choisir qu’une seule. opencv-python, opencv-python-contrib, opencv-python-headless et opencv-python-headless-contrib.
La première officielle contient les modules principaux, la deuxième a le plus de fonctionnalités, les deux autres sont des versions sans interface graphique.
d’autres modules sont très utiles comme numpy et matplotlib
python -m pip install numpy matplotlibPour importer ces modules dans un script Python
import cv2
import numpy as np
import matplotlib.pyplot as plt
Nous allons voir dans ce tutoriel, les fonctions de base de traitement d’image dans OpenCV
Ouvrir, copier, afficher et enregistrer une image
fileDir="./img/"
outDir="./res/"
fileName=  "myimg.png"
img = cv2.imread( fileDir+fileName )

imgout = img.copy()
cv2.imwrite(outDir+"imout.png", imgout)

cv2.imshow('img',img)

cv2.waitKey()
cv2.destroyAllWindow()
N.B.: il est préférable d’utiliser des fichiers PNG pour avoir accès au canal alpha qui détermine la transparence.
Travailler sur les pixels
Les fichiers images sont généralement défini comme 3 matrice de la taille de l’image contenant les couleurs des pixels (Bleu, vert, rouge). La taille de l’image est défini comme le nombre de pixel en hauteur, le nombre de pixel en largeur et la profondeur (nombre de couleur). OpenCV ouvre généralement les images avec 3 channels BGR. Les images en niveau de gris n’ont qu’un seul canal
h,w,c = img.shape #height, width, color channels
for y in range(0, h):
	for x in range(0,w):
		b,g,r = img[y,x] #pixel
B, G, R = cv2.split(img) #split img into color channels
Créer une image
Vous aurez certainement besoin de créer des images pour créer des masques, par exemple. Pour cela, il vous suffit de remplir un np.array dont chaque élément correspond à un pixel
# Create a black image
img = np.zeros((512,512,3), np.uint8)
Dessiner sur une image
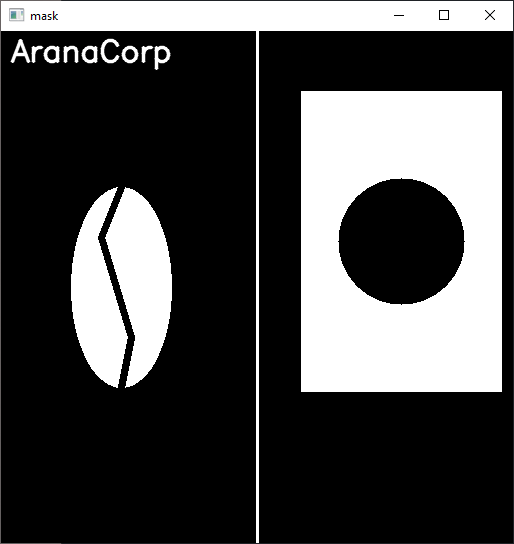
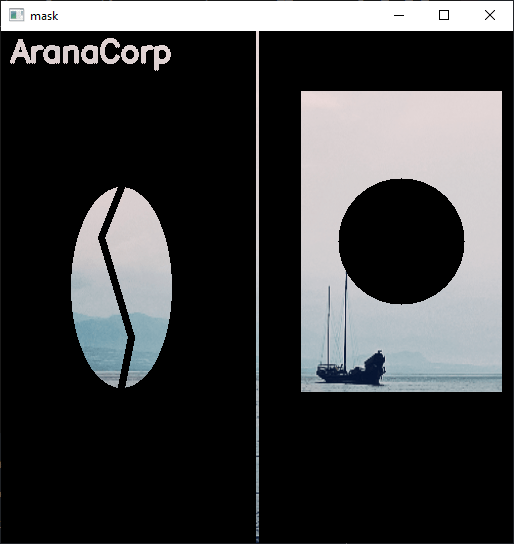
Il est possible de dessiner sur une image pour créer des masques, pour afficher des informations ou pour entourer des éléments, par exemple. Pour tracer des formes, il vous faudra maîtriser les coordonnées des pixels de l’image.
#cv2.line(image, pt1, pt2, color, thickness)
cv2.line(img,(256,0),(256,512),(255,255,255),2)

#cv2.rectangle(image, pt1, pt2, color, thickness)
cv2.rectangle(img,(300,60),(500,360),(255,255,255),-1)

#cv2.circle(image, ptcenter, radius, color, thickness)
cv2.circle(img,(400,210), 63, (0,0,0), -1)

#cv2.ellipse(image, center, axes, angle, startAngle, endAngle, color, thickness)
cv2.ellipse(img,(120,256),(100,50),90,0,360,(255,255,255),-1)

#cv2.polylines(image, pts, isClosed, color, thickness)
pts = np.array([[120,356],[130,306],[100,206],[120,156]], np.int32)
pts = pts.reshape((-1,1,2))
cv2.polylines(img,[pts],False,(0,0,0),6)

#cv2.putText(image, text, pt, font, fontScale, color, thickness, lineType)
font = cv2.FONT_HERSHEY_SIMPLEX
cv2.putText(img,'AranaCorp',(10,30), font, 1,255,2,cv2.LINE_AA)

# thickness = -1 for filled shape
# color = (b,g,r) or g for gray scale or to write on first channel
Interaction utilisateur
Puisque la fonction cv2.imshow n’est pas bloquante, il faut rajouter la fonction waitKey(time_ms) pour bloquer le code avant de rendre la main ou avant que toutes les fenêtres OpenCV soient fermées.
#wait before end of program
key = cv2.waitKey(0) & 0x0FF # wait indefinitely and get input
if key == 27 or key == ord('q'): #key is ESC or q
    cv2.destroyAllWindow()
    sys.exit(0)
Il est aussi possible avec la fonction waitKey de capture les entrées clavier de l’utilisateur
# to perform several tasks according to key
while True:
    key = cv2.waitKey(30) & 0x0FF # wait 30ms and get input
    if key == 27 or key==ord('q'): #key is ESC or q
        print('end program')
        break;
    if key ==ord('a'):
        print("process img")
Modifier la taille d’une image
#specify height and width
scaled_img = cv2.resize(img, (600,300))

#specify scale factor and interpolation method
scaled_img = cv2.resize(img, None, fx= 0.5, fy= 0.5, interpolation= cv2.INTER_LINEAR)
#methods cv2.INTER_LINEAR INTER_AREA, INTER_CUBIC

# specify scale factor
h,w,c = img.shape
scale_f = 0.5
height = int(h*scale_f)
width = int(w*scale_f)
scaled_img = cv2.resize(img, (width,height))

# specify new width
h,w,c = img.shape
width = 700
scale_f = width/w
height = int(h*scale_f)
scaled_img = cv2.resize(img, (width,height))

# use shape of img1
scaled_img = cv2.resize(img, img1.shape[1::-1])
Concaténer plusieurs images
Il est possible de concaténer des images:
- verticalement si elles sont de même largeur (width)
- horizontalement si elles sont de même hauteur (height)
im_v = cv2.vconcat([img1, img2])

im_h = cv2.hconcat([img1, img2])
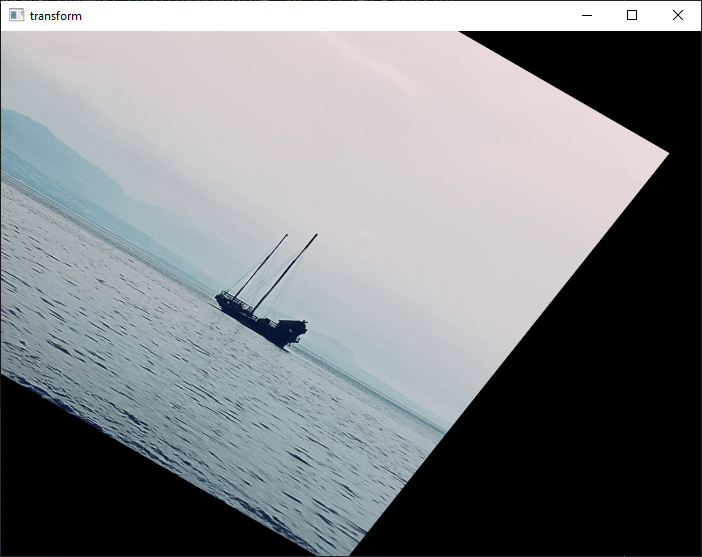
Transformation géométrique d’une image
h,w,c = img.shape

#flip
fliph = cv2.flip(img, 0) #horizontally
flipr = cv2.flip(img, 1) #vertically

# Rotation
center = (h/2, w/2)
angle = 30
scale = 1
rotation_matrix = cv2.getRotationMatrix2D(center, angle, scale)
rotated_image = cv2.warpAffine(img, rotation_matrix, (w, h))

# Translation matrix
tx = 100
ty = 70
translation_matrix = np.array([[1, 0, tx], [0, 1, ty]], dtype=np.float32)
translated_image = cv2.warpAffine(img, translation_matrix, (w,h))


# Shearing matrix
shearX = -0.15
shearY = 0
shear_matrix = np.array([[1, shearX, 0],  [0, 1, shearY]], dtype=np.float32)
sheared_image = cv2.warpAffine(img, shear_matrix, (w, h))
Il est possible de combiner les matrices de transformation en convertissant les matrices en coordonnées homogènes et en appliquant un produit scalaire sur les matrices (A@B <=> np.dot(A,B))
# convert matrix to homogeneous coordinates
rot_hom = np.append(rotation_matrix, [[0, 0, 1]], axis=0)
tr_hom = np.append(translation_matrix, [[0, 0, 1]], axis=0)
sh_hom = np.append(shear_matrix, [[0, 0, 1]], axis=0)
rt_mat = rot_hom@tr_hom@sh_hom # shear then translated then rotated
transform_matrix = rt_mat[:2,:]

#combined transofrm
transformed_image = cv2.warpAffine(img, transform_matrix, (w, h))
N.B. : attention à l’ordre d’application des matrices, shear S, puis translation T puis rotation T :Tr = R @ T @ S
Opérations arithmétiques et logiques sur les images
Vous pouvez combiner des images et des masques avec des opérateurs arithmétiques et logique. N’hésitez pas à vous entraîner en créant un masque et son inverse pour comprendre et jouer avec ces opérateurs.
#isum = cv2.add(img1,img2) #add images
wsum = cv2.addWeighted(img1, 0.2, img2, 0.5, 0)  #add images with weight
sub = cv2.subtract(img1,img2) #substract images

res_and = cv2.bitwise_and(img1, img2, mask = None) # AND operator
res_or = cv2.bitwise_or(img1, img2, mask = None)  # OR operator
res_xor = cv2.bitwise_xor(img1, img2, mask = None) # XOR operator
res_not = cv2.bitwise_not(img1, mask = None)  #NOT operator

res_mask = cv2.bitwise_and(img1, img1, mask = img2) # apply mask
N.B.: pour les opérations les images img1 et img2 doivent être de même taille et de même profondeur
Conversion de couleur
img_gray = cv2.cvtColor(img, cv2.COLOR_BGR2GRAY) # gray scale conversion 1 channel
img_hsv = cv2.cvtColor(img, cv2.COLOR_BGR2HSV) # HSV conversion
img_rgb = cv2.cvtColor(img, cv2.COLOR_BGR2RGB) # RGB conversion
Filtrer une image
Il existe différentes techniques pour filtrer une image notamment par couleur, par masque ou par niveau.
# contrast and brightness
alpha = 1.5 # Contrast control (1.0-3.0)
beta = 30 # Brightness control (0-100)
contrast = cv2.convertScaleAbs(img, alpha=alpha, beta=beta)
cv2.imshow('contrast',contrast)

# niveau
gray = cv2.cvtColor(img, cv2.COLOR_BGR2GRAY)
ret, thresh = cv2.threshold(gray, 120, 255, cv2.THRESH_BINARY)
# cv2.THRESH_BINARY_INV,cv2.THRESH_TRUNC,cv2.THRESH_TOZERO,cv2.THRESH_TOZERO_INV
cv2.imshow('thresh',thresh)
Il existe également des algorithmes pour filtrer des images en appliquant à un pixel des calculs sur les pixels voisins. Ces filtres peuvent permettre d’améliorer les images ou de les préparer à l’entraînement de modèle de reconnaissance visuelle.
- floutage gaussien: utilisé pour réduire le bruit et les détails
- floutage median: utilisé dans certains cas pour réduire le bruit tout en conservant les contours
- floutage bilatéral: filtre de bruit permettant de conserver les contours
# Gaussian Blur
Gaussian = cv2.GaussianBlur(image, (7, 7), 0)
cv2.imshow('Gaussian Blurring', Gaussian)

# Median Blur
median = cv2.medianBlur(image, 5)
cv2.imshow('Median Blurring', median)

# Bilateral Blur
bilateral = cv2.bilateralFilter(image, 9, 75, 75)
cv2.imshow('Bilateral Blurring', bilateral)

cv2.waitKey(0)
N.B.: vous pouvez flouter vos masques pour donner des effets intéressant

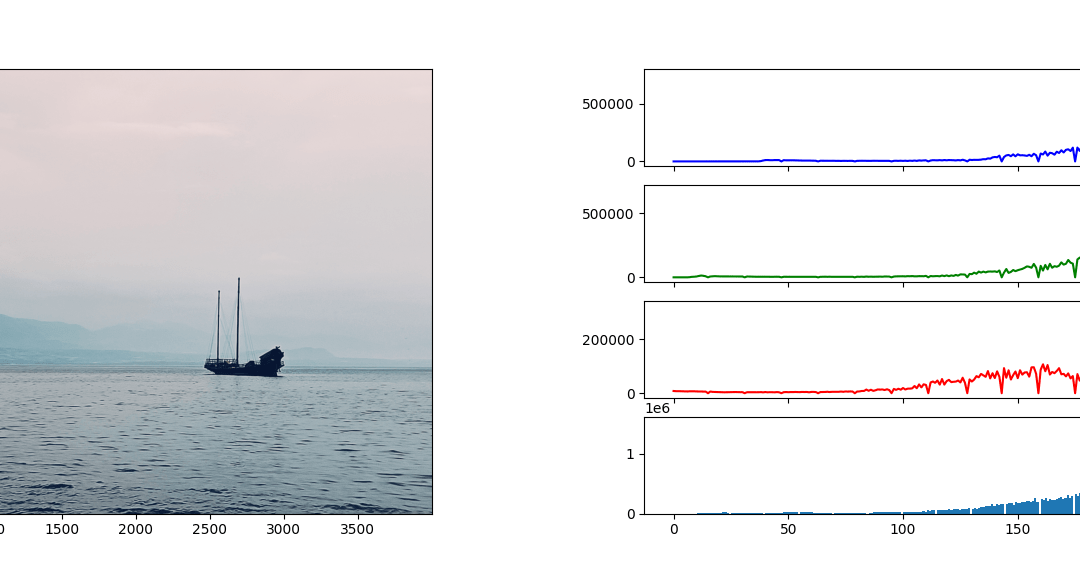
Analyse de couleur d’une image
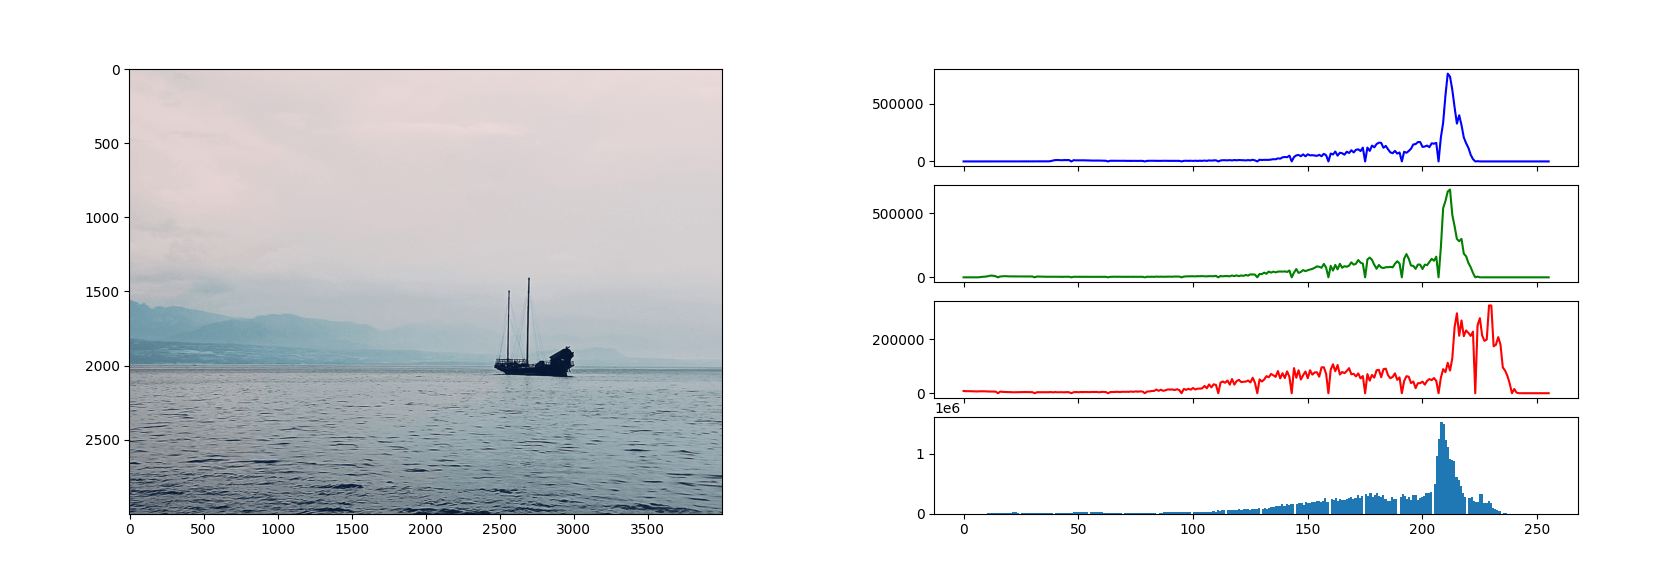
Il peut être intéressant avant de travailler sur une image de connaître la distribution en terme de couleur pour savoir sur quel fonction travailler
def displayImgHist():
	#compute histograms
	crange = [10,250]
	#cv2.calcHist(images, channel, mask, histSize, ranges[, hist[, accumulate]])
	histb = cv2.calcHist([img],[0],None,[256],crange)
	histg = cv2.calcHist([img],[1],None,[256],crange)
	histr = cv2.calcHist([img],[2],None,[256],crange)

	#plot subplots
	imgrgb = cv2.cvtColor(img, cv2.COLOR_BGR2RGB) #matplotlib in RGB

	fig = plt.figure("Image Color Analysis",figsize=(10, 8))
	(col1fig, col2fig) = fig.subfigures(1, 2)
	col1_ax = col1fig.add_subplot()
	col2_axs = col2fig.subplots(4,1, sharex=True)
	col1_ax.imshow(imgrgb)
	col2_axs[0].plot(histb,'b')
	col2_axs[1].plot(histg,'g')
	col2_axs[2].plot(histr,'r')
	col2_axs[3].hist(img.ravel(),256,crange)

	plt.show()
Gestion d’évènement
Nous avons vu que nous pouvions capter les entrées claviers.
while True:
    key = cv2.waitKey(30) & 0x0FF # wait 30ms and get input
    if key == 27 or key==ord('q'): #key is ESC or q
        print('end program')
        break;
    if key ==ord('a'):
        print("process img")
Nous pouvons également détecter la souris ou des widget pour rendre l’image interactive
def click_event(event, x, y, flags, params):
	if event == cv2.EVENT_LBUTTONDOWN:
		rgb = img[y,x]
		print('[{x}, {y}] : rgb: ({})'.format(rgb))
cv2.setMouseCallback(win_name, click_event, [win_name])
Exemple de zoom à l’aide de la molette de la souris
base_img = cv2.imread( fileName )
img = base_img.copy()

zoom = 1
min_zoom = 1
max_zoom = 5


def zoom_scroll(event, x, y, flags, param):
    #global base_img, zoom, min_zoom, max_zoom
    global zoom
    window_name = param[0]
    base_img =  param[1]
    if event == cv2.EVENT_MOUSEWHEEL:
        if flags > 0:
            zoom *= 1.1
            zoom = min(zoom, max_zoom)
        else:
            zoom /= 1.1
            zoom = max(zoom, min_zoom)

        img = base_img.copy()

        # Calculate zoomed-in image size
        new_width = round(img.shape[1] / zoom)
        new_height = round(img.shape[0] / zoom)

        # Calculate offset
        x_offset = round(x - (x / zoom))
        y_offset = round(y - (y / zoom))

        # Crop image
        img = img[
            y_offset : y_offset + new_height,
            x_offset : x_offset + new_width,
        ]

        # Stretch image to full size
        img = cv2.resize(img, (base_img.shape[1], base_img.shape[0]))
        cv2.imshow(window_name, img)

cv2.imshow('orig', img)
cv2.setMouseCallback('orig', zoom_scroll, ['orig',base_img])
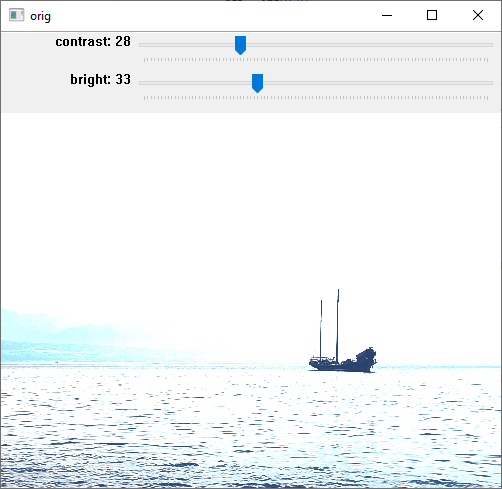
Un widget pratique est le trackbar permettant de faire évoluer une variable comme la valeur d’un filtre
alpha = 1
beta = 0
def change_contrast(value):
	global alpha
	alpha = (3.0-1.0)*value/100+1. # Contrast control (1.0-3.0)
	contrast = cv2.convertScaleAbs(img, alpha=alpha, beta=beta)
	cv2.imshow('orig',contrast)

def change_brightness(value):
	global beta
	beta = value # Brightness control (0-100)
	contrast = cv2.convertScaleAbs(img, alpha=alpha, beta=beta)
	cv2.imshow('orig',contrast)

cv2.createTrackbar('contrast', 'orig', 0, 100, change_contrast)
cv2.createTrackbar('bright', 'orig', 0, 100, change_brightness)
Format Vidéo
Le module OpenCV peut également gérer des images en temps réel provenant d’un fichier vidéo ou d’une caméra. Vous pouvez donc utiliser ce tutoriel pour le traitement d’une vidéo image par image.
import cv2
cap = cv2.VideoCapture('myvideo.mp4') #cv2.VideoCapture(0) or url

while(cap.isOpened()):
    ret, frame = cap.read()
    if ret == True:
        cv2.imshow('Frame', frame)

        if cv2.waitKey(25) & 0xFF == ord('q'):
            break
    else:
        break

cap.release()
cv2.destroyAllWindows()
Applications
- Reconnaissance de formes avec Python
- Détection de contour avec OpenCV
- Filtrer les couleurs avec OpenCV
- Gestion d’une caméra avec OpenCV
