El sensor DHT11 puede medir la temperatura y la humedad en una habitación. Aquí hay un tutorial sobre cómo recuperar la medición del sensor con una Arduino.
Material
- Computadora
- Arduino UNO
- USB cable
- sensor DHT11
- Cables de puente M/M
- tablero de circuitos
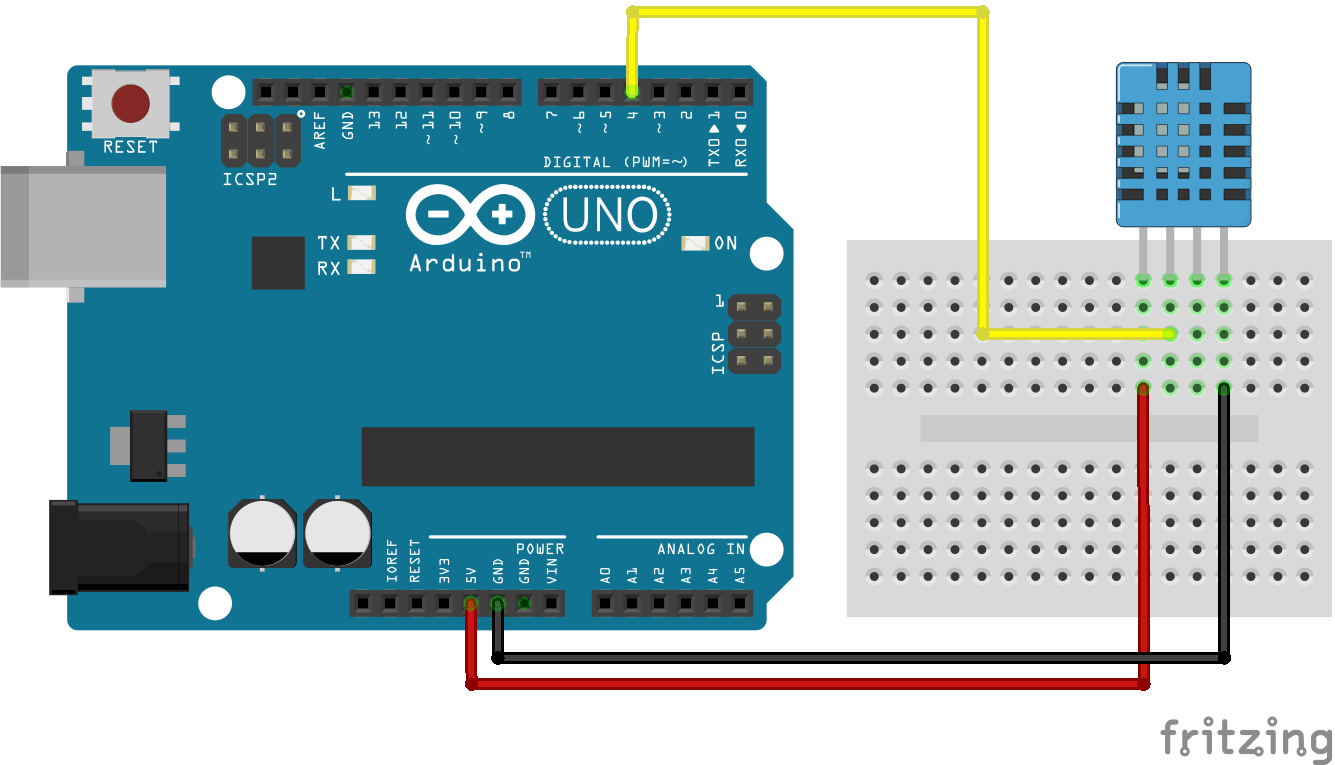
Diagrama de conexión

Código
El programa para leer la medición del sensor DHT11 es bastante complejo y requiere un poco de trabajo. En tal caso, la forma más fácil es usar una biblioteca desarrollada por Arduino u otros usuarios. Esas bibliotecas pueden provenir de muchas fuentes: Arduino, por supuesto, pero también GitHub que es una referencia en el intercambio de códigos. En nuestro caso, copiamos el código de Arduino.
Crear carpeta de biblioteca
Las bibliotecas a menudo están disponibles como archivos ZIP descargables que deben extraerse en la carpeta de la biblioteca IDE (generalmente. \ Documents \ Arduino \ bibliotecas). Para usar el código sin formato copiado de una fuente aleatoria, necesitamos crear manualmente los archivos .h y .cpp, en una carpeta DHT11lib, en la que copiaremos y pegaremos el código del sitio web.

dht11.h
//
//    FILE: dht11.h
// VERSION: 0.4.1
// PURPOSE: DHT11 Temperature & Humidity Sensor library for Arduino
// LICENSE: GPL v3 (https://www.gnu.org/licenses/gpl.html)
//
// DATASHEET: https://www.micro4you.com/files/sensor/DHT11.pdf
//
//     URL: https://playground.arduino.cc/Main/DHT11Lib
//
// HISTORY:
// George Hadjikyriacou - Original version
// see dht.cpp file
//

#ifndef dht11_h
#define dht11_h

#if defined(ARDUINO) && (ARDUINO >= 100)
#include <Arduino.h>
#else
#include <WProgram.h>
#endif

#define DHT11LIB_VERSION "0.4.1"

#define DHTLIB_OK        0
#define DHTLIB_ERROR_CHECKSUM -1
#define DHTLIB_ERROR_TIMEOUT  -2

class dht11
{
public:
    int read(int pin);
  int humidity;
  int temperature;
};
#endif
//
// END OF FILE
//
dht11.cpp
//
//    FILE: dht11.cpp
// VERSION: 0.4.1
// PURPOSE: DHT11 Temperature & Humidity Sensor library for Arduino
// LICENSE: GPL v3 (https://www.gnu.org/licenses/gpl.html)
//
// DATASHEET: https://www.micro4you.com/files/sensor/DHT11.pdf
//
// HISTORY:
// George Hadjikyriacou - Original version (??)
// Mod by SimKard - Version 0.2 (24/11/2010)
// Mod by Rob Tillaart - Version 0.3 (28/03/2011)
// + added comments
// + removed all non DHT11 specific code
// + added references
// Mod by Rob Tillaart - Version 0.4 (17/03/2012)
// + added 1.0 support
// Mod by Rob Tillaart - Version 0.4.1 (19/05/2012)
// + added error codes
//

#include "dht11.h"

// Return values:
// DHTLIB_OK
// DHTLIB_ERROR_CHECKSUM
// DHTLIB_ERROR_TIMEOUT
int dht11::read(int pin)
{
  // BUFFER TO RECEIVE
  uint8_t bits[5];
  uint8_t cnt = 7;
  uint8_t idx = 0;

  // EMPTY BUFFER
  for (int i=0; i< 5; i++) bits[i] = 0;

  // REQUEST SAMPLE
  pinMode(pin, OUTPUT);
  digitalWrite(pin, LOW);
  delay(18);
  digitalWrite(pin, HIGH);
  delayMicroseconds(40);
  pinMode(pin, INPUT);

  // ACKNOWLEDGE or TIMEOUT
  unsigned int loopCnt = 10000;
  while(digitalRead(pin) == LOW)
    if (loopCnt-- == 0) return DHTLIB_ERROR_TIMEOUT;

  loopCnt = 10000;
  while(digitalRead(pin) == HIGH)
    if (loopCnt-- == 0) return DHTLIB_ERROR_TIMEOUT;

  // READ OUTPUT - 40 BITS => 5 BYTES or TIMEOUT
  for (int i=0; i<40; i++)
  {
    loopCnt = 10000;
    while(digitalRead(pin) == LOW)
      if (loopCnt-- == 0) return DHTLIB_ERROR_TIMEOUT;

    unsigned long t = micros();

    loopCnt = 10000;
    while(digitalRead(pin) == HIGH)
      if (loopCnt-- == 0) return DHTLIB_ERROR_TIMEOUT;

    if ((micros() - t) > 40) bits[idx] |= (1 << cnt);
    if (cnt == 0)   // next byte?
    {
      cnt = 7;    // restart at MSB
      idx++;      // next byte!
    }
    else cnt--;
  }

  // WRITE TO RIGHT VARS
        // as bits[1] and bits[3] are always zero they are omitted in formulas.
  humidity    = bits[0];
  temperature = bits[2];

  uint8_t sum = bits[0] + bits[2];

  if (bits[4] != sum) return DHTLIB_ERROR_CHECKSUM;
  return DHTLIB_OK;
}
//
// END OF FILE
//
Uso de la biblioteca.
Una vez que la biblioteca se creó y se presentó en el IDE, podemos crear el archivo .ino en el que usamos la biblioteca. Adaptamos ligeramente el ejemplo del sitio web para adaptarlo a nuestro caso.
#include <dht11.h>

dht11 DHT11;

#define DHT11PIN 4

void setup()
{
  Serial.begin(9600);
  Serial.println("DHT11 TEST PROGRAM ");
  Serial.print("LIBRARY VERSION: ");
  Serial.println(DHT11LIB_VERSION);
  Serial.println();
}

void loop()
{
  Serial.println("\n");

  int chk = DHT11.read(DHT11PIN);

  Serial.print("Read sensor: ");
  switch (chk)
  {
    case DHTLIB_OK:
    Serial.println("OK");
    Serial.print("Humidity (%): ");
    Serial.println((float)DHT11.humidity, 2);

    Serial.print("Temperature (°C): ");
    Serial.println((float)DHT11.temperature, 2);

    Serial.print("Temperature (°F): ");
    Serial.println(Fahrenheit(DHT11.temperature), 2);

    Serial.print("Temperature (°K): ");
    Serial.println(Kelvin(DHT11.temperature), 2);

    Serial.print("Dew PointFast (°C): ");
    Serial.println(dewPointFast(DHT11.temperature, DHT11.humidity));

    break;
    case DHTLIB_ERROR_CHECKSUM:
    Serial.println("Checksum error");
    break;
    case DHTLIB_ERROR_TIMEOUT:
    Serial.println("Time out error");
    break;
    default:
    Serial.println("Unknown error");
    break;
  }

  delay(2000);
}

//Celsius to Fahrenheit conversion
double Fahrenheit(double celsius)
{
  return 1.8 * celsius + 32;
}

//Celsius to Kelvin conversion
double Kelvin(double celsius)
{
  return celsius + 273.15;
}

// dewPoint function NOAA
// reference (1) : http://wahiduddin.net/calc/density_algorithms.htm
// reference (2) : http://www.colorado.edu/geography/weather_station/Geog_site/about.htm

double dewPointFast(double celsius, double humidity)
{
  double a = 17.271;
  double b = 237.7;
  double temp = (a * celsius) / (b + celsius) + log(humidity*0.01);
  double Td = (b * temp) / (a - temp);
  return Td;
}
N.B.: cuando copie el código de un sitio web, compruebe siempre si la versión y el cableado de sus componentes son los mismos para evitar problemas de compatibilidad.
N.B.: existe otra versión de DHT11. Si tiene una de esas otras versiones, consulte la biblioteca DHTLib.
Solicitud
- Cree una estación meteo con un sensor DHT11 y una pantalla LCD
Sources
Encuentre otros tutoriales y ejemplos en el generador de código automático
Arquitecto de Código


