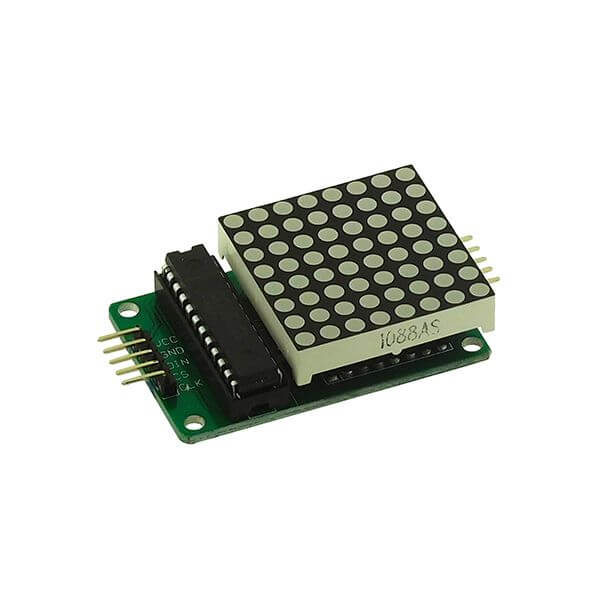
The 8×8 LED array has 8 rows and 8 columns of individually controllable LEDs. LED arrays can be useful for advertising signs, temperature display, and so on.
Material
- Computer
- Arduino UNO
- USB A Male Cable
- LED array
Principle of operation
The LED matrix module contains a driver board with a MAX7219 register that allows simple interfacing with a microcontroller while managing the status of 64 LEDs. There are several sizes of matrix depending on the number of shift registers used.
Scheme
The matrix module uses 3 pins of the microcontroller. It can be powered by the 5V output of the microcontroller.
Code
To manage the LED matrix, there is no particular library; you have to select the state of the LED for each pixel. For this purpose it is possible to send a hexadecimal value for each line. To get the hexadecimal values according to what you want to draw, you can use this tool.
int DIN_pin = 11;
int CS_pin = 10;
int CLK_pin = 12;
int D[8] = {0xC0, 0xA0, 0x90, 0x88, 0x84, 0x98, 0x90, 0xE0}; //afficher la lettre D
int A[8] = {0x18, 0x24, 0x42, 0x42, 0x7E, 0x42, 0x42, 0x42}; //afficher la lettre A
int M[8] = {0xC3, 0xA5, 0x99, 0x99, 0x81, 0x81, 0x81, 0x81}; //afficher la lettre M
int I[8] = {0x7C, 0x10, 0x10, 0x10, 0x10, 0x10, 0x10, 0x7C}; //afficher la lettre I
int E[8] = {0x00, 0x7E, 0x40, 0x40, 0x7E, 0x40, 0x40, 0x7E}; //afficher la lettre E
int N[8] = {0xC1, 0xA1, 0x91, 0x89, 0x85, 0x82, 0x80, 0x80}; //afficher la lettre N
void write_pix(int data)
{
 digitalWrite(CS_pin, LOW);
 for (int i = 0; i < 8; i++)
 {
   digitalWrite(CLK_pin, LOW);
   digitalWrite(DIN_pin, data & 0x80); // masquage de donnée
   data = data << 1; // on décale les bits vers la gauche
   digitalWrite(CLK_pin, HIGH);
 }
}
void write_line(int adress, int data)
{
 digitalWrite(CS_pin, LOW);
 write_pix(adress);
 write_pix(data);
 digitalWrite(CS_pin, HIGH);
}
void write_matrix(int *tab)
{
 for (int i = 0; i < 8; i++) write_line(i + 1, tab[i]);
}
void init_MAX7219(void)
{
 write_line(0x09, 0x00); //decoding BCD
 write_line(0X0A, 0x01); //brightness
 write_line(0X0B, 0x07); //scanlimit 8leds
 write_line(0X0C, 0x01); //power-down mode 0, normalmode1;
 write_line(0X0F, 0x00);
}
void clear_matrix(void)
{
 const int clean[8] = {0x00, 0x00, 0x00, 0x00, 0x00, 0x00, 0x00, 0x00};
 write_matrix(clean);
}
int intToHex(int x)
{
 switch (x)
 {
   case 0: return 0x01; break; //LED sur la première case
   case 1: return 0x02; break; //LED sur 2 case
   case 2: return 0x04; break; //LED sur 3 case
   case 3: return 0x08; break; //LED sur 4 case
   case 4: return 0x10; break; //LED sur 5 case
   case 5: return 0x20; break; //LED sur 6 case
   case 6: return 0x40; break; //LED sur 7 case
   case 7: return 0x80; break; //LED sur 8 case
 }
}
void setup()
{
 pinMode(CS_pin, OUTPUT);
 pinMode(DIN_pin, OUTPUT);
 pinMode(CLK_pin, OUTPUT);
 delay(50);
 init_MAX7219();
 clear_matrix();
}
void loop()
{
 write_matrix(D);
 delay(500);
 write_matrix(A);
 delay(500);
 write_matrix(M);
 delay(500);
 write_matrix(I);
 delay(500);
 write_matrix(E);
 delay(500);
 write_matrix(N);
 delay(500);
}
In this example, we have described the first name “Damien” with hexadecimal values for each LED. It is up to you to define the values to be able to display the alphabetical or numerical characters or any other design you wish.
Applications
- Create a graphical interface with multiple arrays
- Create a video game with a single screen

