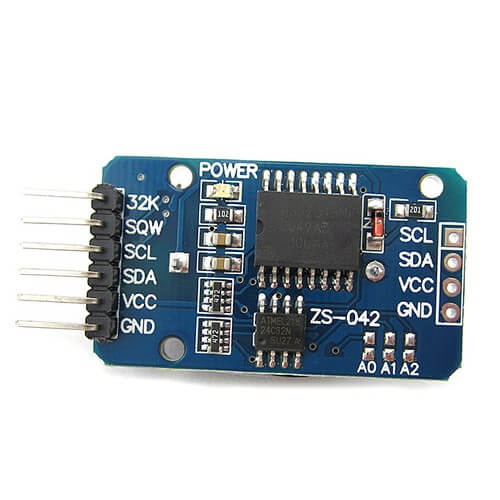
Every computer is equipped with an internal real time clock that allows it to know the date. Arduino type microcontrollers do not have PSTN. The DS3231 module gives the Arduino the ability to calculate the date, allowing it to control time more precisely.

Hardware
- Computer
- Arduino UNO
- USB cable A Male to B Male
- Real Time Clock DS3231
Principle of operation
A real time clock module is usually equipped with a quartz oscillator to measure time and a battery to store this measurement even when the main power supply is switched off.
Schematic
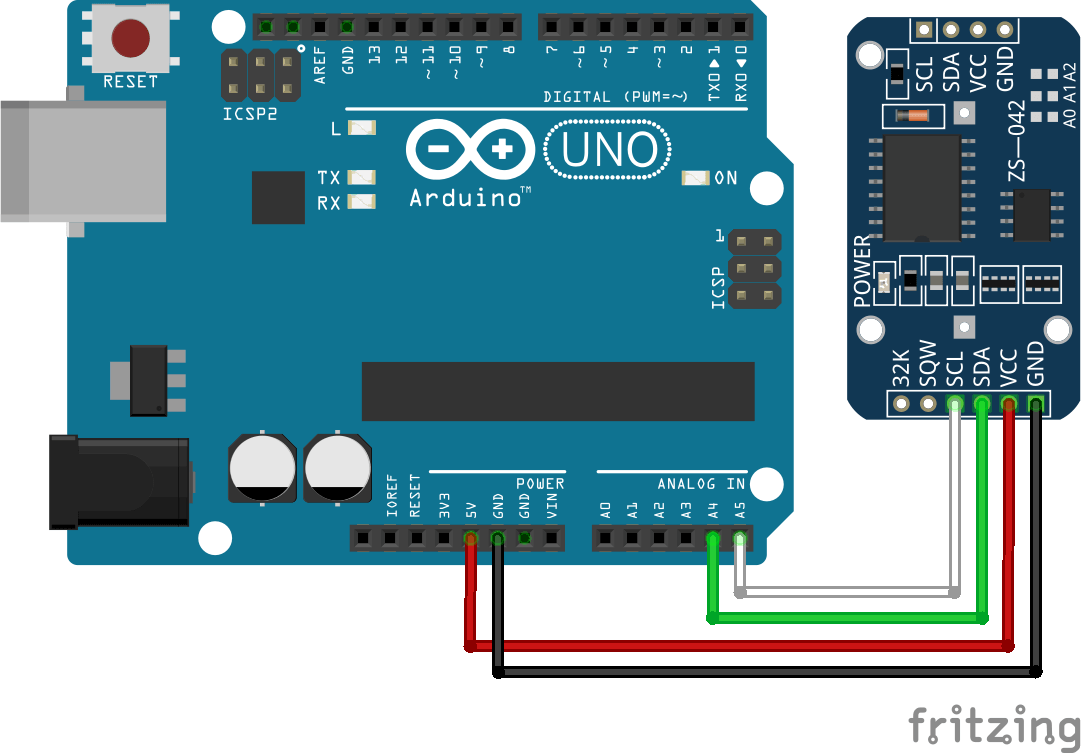
The DS3231 module uses I2C communication to interface with the microcontroller. So we plug it in:
- SDA to pin A4
- SCL to pin A5
- VCC to pin 5V
- GND to pin GND

Code
To communicate with the DS3231 module, we use the library DS3231.h which must be installed in the library manager. When using for the first time or changing the battery, the time and date will not be set. In the following code, the date can be set by entering the desired date in the serial monitor as YYMMDDwHHMMSSx. Once the date has been entered, you will need to restart the card so that it can be taken into account by the module.
Once the clock is set to the correct date, you will be able to delete the part of the code setDate and getDateStuff.
//Libraries
#include <Wire.h>//https://www.arduino.cc/en/reference/wire
#include <DS3231.h>//https://github.com/NorthernWidget/DS3231

//Variables
byte Year ;
byte Month ;
byte Date ;
byte DoW ;
byte Hour ;
byte Minute ;
byte Second ;
bool Century  = false;
bool h12 ;
bool PM ;

//Objects
DS3231 Clock;

void setup() {
  //Init Serial USB
  Serial.begin(9600);
  Serial.println(F("Initialize System"));
  Wire.begin();
}

void loop() {
  setDate();
  readRTC();
}

void readRTC( ) { /* function readRTC */
  ////Read Real Time Clock
  Serial.print(Clock.getYear(), DEC);
  Serial.print("-");
  Serial.print(Clock.getMonth(Century), DEC);
  Serial.print("-");
  Serial.print(Clock.getDate(), DEC);
  Serial.print(" ");
  Serial.print(Clock.getHour(h12, PM), DEC); //24-hr
  Serial.print(":");
  Serial.print(Clock.getMinute(), DEC);
  Serial.print(":");
  Serial.println(Clock.getSecond(), DEC);
  delay(1000);
}

void setDate( ) { /* function setDate */
  ////Set Real Time Clock
  if (Serial.available()) {

    //int _start = millis();

    GetDateStuff(Year, Month, Date, DoW, Hour, Minute, Second);

    Clock.setClockMode(false);  // set to 24h

    Clock.setSecond(Second);
    Clock.setMinute(Minute);
    Clock.setHour(Hour);
    Clock.setDate(Date);
    Clock.setMonth(Month);
    Clock.setYear(Year);
    Clock.setDoW(DoW);

  }
}

void GetDateStuff(byte& Year, byte& Month, byte& Day, byte& DoW, byte& Hour, byte& Minute, byte& Second) { /* function GetDateStuff */
  ////Get date data
  // Call this if you notice something coming in on
  // the serial port. The stuff coming in should be in
  // the order YYMMDDwHHMMSS, with an 'x' at the end.
  boolean GotString = false;
  char InChar;
  byte Temp1, Temp2;
  char InString[20];

  byte j = 0;
  while (!GotString) {
    if (Serial.available()) {
      InChar = Serial.read();
      InString[j] = InChar;
      j += 1;
      if (InChar == 'x') {
        GotString = true;
      }
    }
  }
  Serial.println(InString);
  // Read Year first
  Temp1 = (byte)InString[0] - 48;
  Temp2 = (byte)InString[1] - 48;
  Year = Temp1 * 10 + Temp2;
  // now month
  Temp1 = (byte)InString[2] - 48;
  Temp2 = (byte)InString[3] - 48;
  Month = Temp1 * 10 + Temp2;
  // now date
  Temp1 = (byte)InString[4] - 48;
  Temp2 = (byte)InString[5] - 48;
  Day = Temp1 * 10 + Temp2;
  // now Day of Week
  DoW = (byte)InString[6] - 48;
  // now Hour
  Temp1 = (byte)InString[7] - 48;
  Temp2 = (byte)InString[8] - 48;
  Hour = Temp1 * 10 + Temp2;
  // now Minute
  Temp1 = (byte)InString[9] - 48;
  Temp2 = (byte)InString[10] - 48;
  Minute = Temp1 * 10 + Temp2;
  // now Second
  Temp1 = (byte)InString[11] - 48;
  Temp2 = (byte)InString[12] - 48;
  Second = Temp1 * 10 + Temp2;
}
Result
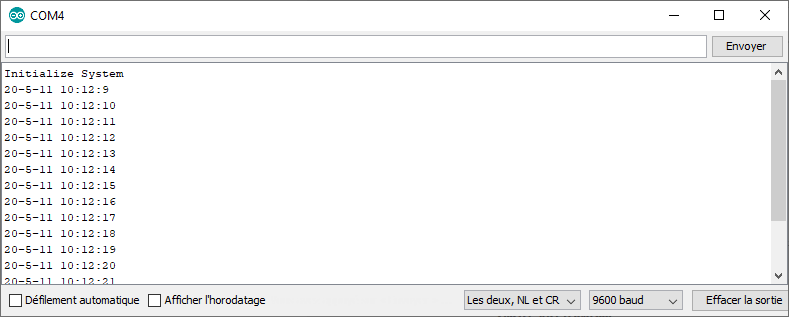
Once the time and date have been initialized and the card restarted, the date is displayed every second. The delay() function has been added to simplify viewing on the serial monitor. In practice, you will not need the delay function when using the ds3231 module.

Applications
- Making an alarm clock with Arduino
Sources
Find other examples and tutorials in our Automatic code generator
Code Architect


