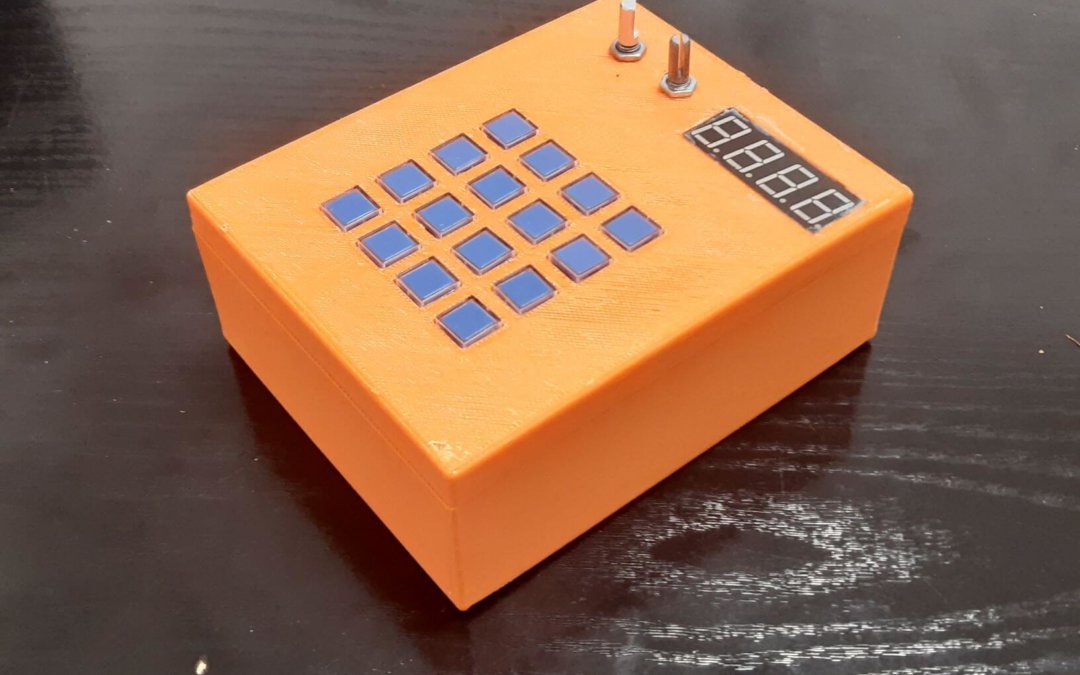
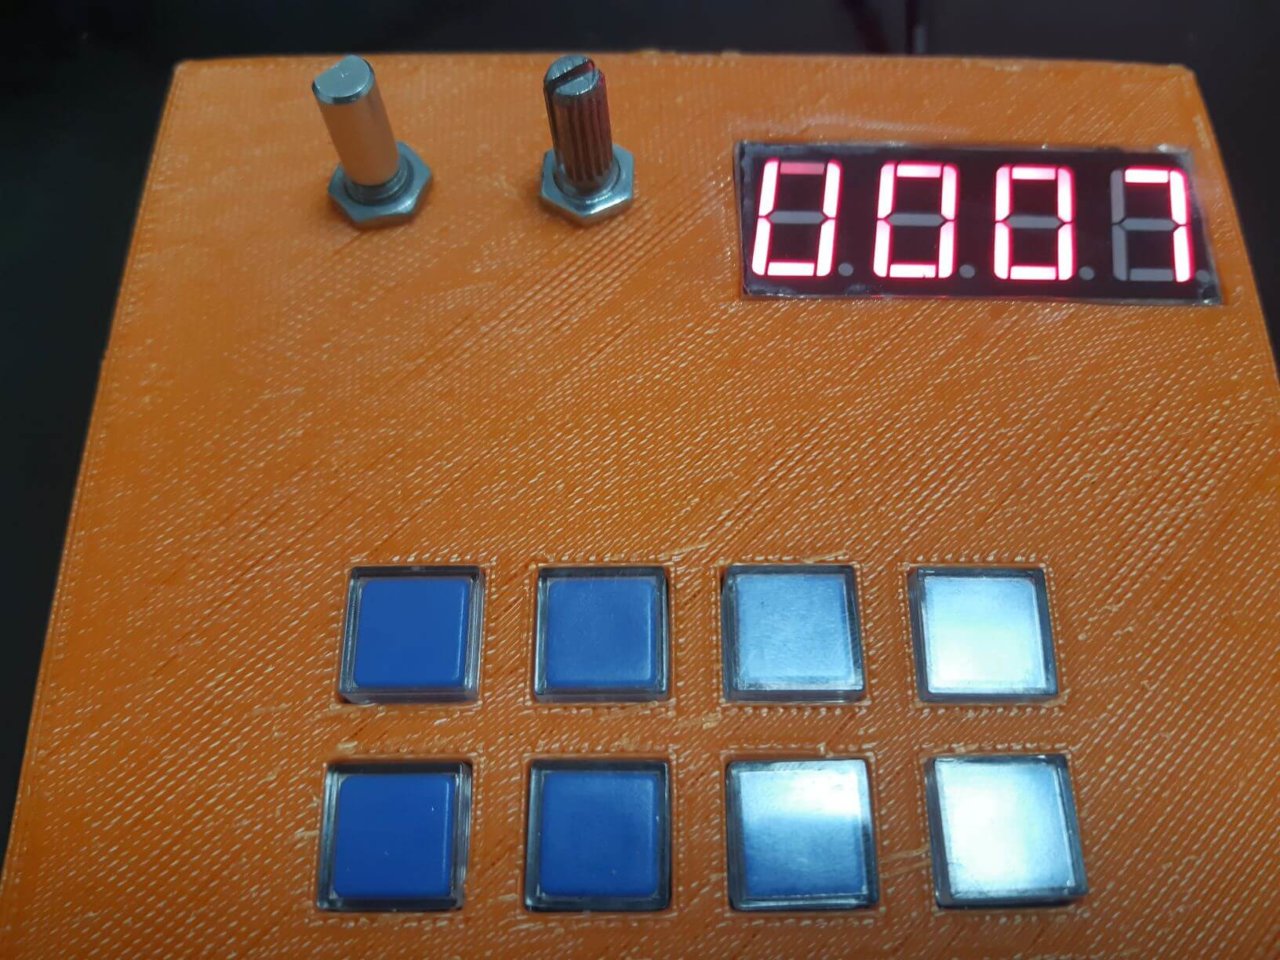
En este proyecto vamos a construir una caja MIDI para poder probar los instrumentos del sintetizador CoolSoft y tocar algunas notas. Vamos a utilizar tres sensores para modificar los mensajes MIDI. Eres libre de añadir elementos para hacer un controlador MIDI más completo.
Requisitos previos: Creación de una interfaz MIDI con Arduino
Equipamiento
- Arduino UNO
- potenciómetro
- codificador rotatorio
- teclado analógico 4×4
Características
Para probar la comunicación MIDI y el sintetizador. Vamos a definir algunas funciones simples:
- Usando el teclado, vamos a enviar notas musicales
- Le potenciómetro permet d’ajuster la vitesse de la note
- Y el codificador modificará el instrumento sintetizado
N.B.: Elegimos un teclado analógico para este proyecto porque es fácil de cablear y nos permite probar rápidamente el sintetizador. El inconveniente es que sólo se puede pulsar una tecla a la vez. Para obtener un controlador MIDI más eficaz, puedes optar por un teclado digital o botones arcade que te proporcionen información sobre las notas tocadas.
Diagrama
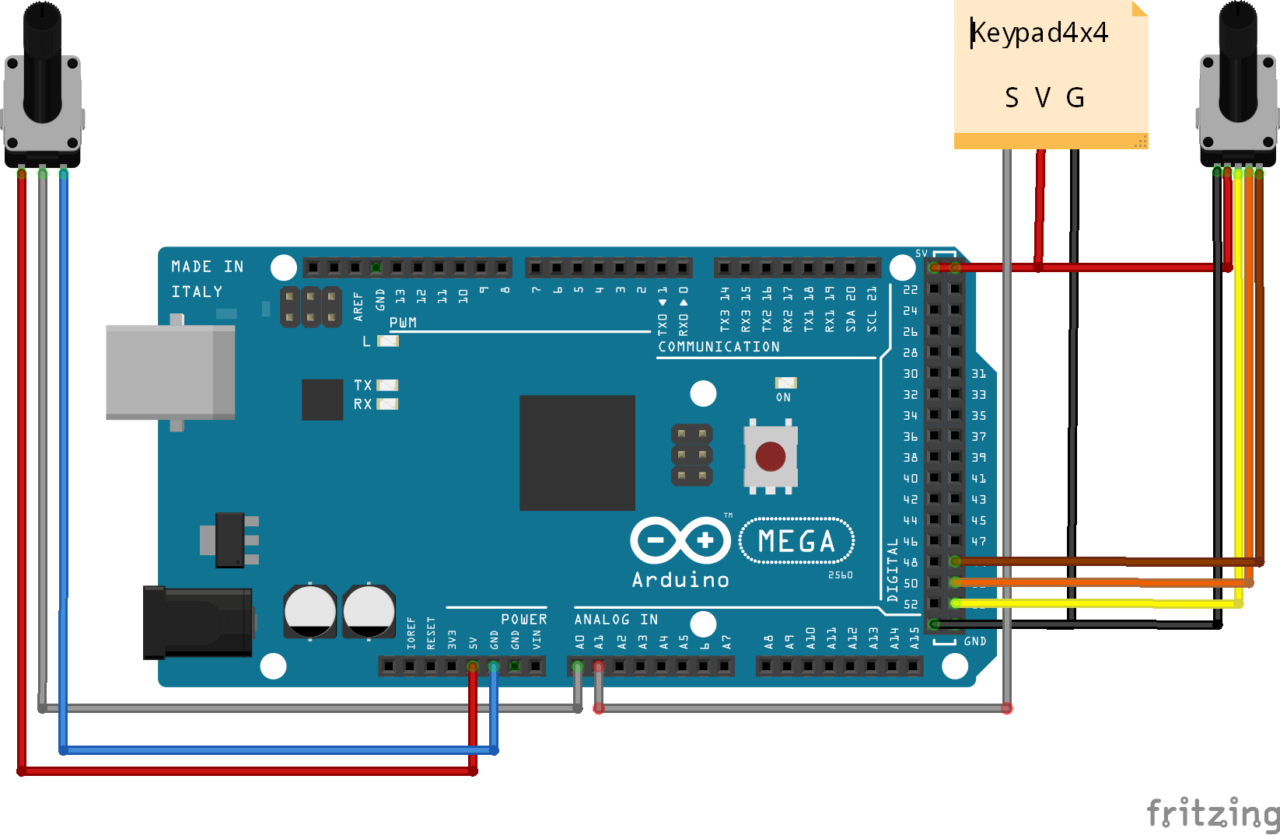
N.B.: Para facilitar la lectura, hemos eliminado la pantalla de 7 segmentos. Puede encontrar la conexión en este tutorial.
Descripción del código
En primer lugar, definiremos funciones para gestionar cada uno de los sensores.
Para el teclado 4×4, asignamos a cada tecla un identificador que corresponde a una nota. Creamos una función que devuelve el identificador cuando se pulsa una tecla.
const int valThresh[nbABtn] = {1000, 900, 820, 750, 660, 620, 585, 540, 500, 475, 455, 425, 370, 300, 260, 200};
const int pitches[nbABtn] = {50, 52, 54, 56, 58, 60, 62, 64, 66, 68, 70, 72, 74, 76, 78, 80 }
int getABtn() { /* function getABtn */
 //// Read button states from keypad
 int val = analogRead(abtnPin);
 if (val <= 200) {
   return 0;
 } else {
   for (int i = 0; i < 16; i++) {
     if (val > valThresh[i]) {
       delay(100);
       return i + 1;
     }
   }
 }
}
Definimos una función readPot que modificará el valor de la velocidad en función del valor del potenciómetro velVal.
void readPot(){
  velVal = map(int(analogRead(potPin) / 10) * 10, 0, 1023, 0, 127);
  if (oldVel != velVal) {
    //Serial.println(velVal);
    velocity = velVal;
  }
  oldVel = velVal;
}
La función que gestiona el codificador nos permite modificar el instrumento musical (identificador rotVal entre 0 y 127).
void readRotary( ) { /* function readRotary */
  ////Test routine for Rotary
  // gestion position
  clkState = digitalRead(clkPin);
  if ((clkLast == LOW) && (clkState == HIGH)) {//rotary moving
    if (digitalRead(dtPin) == HIGH) {
      rotVal = rotVal - 1;
      if ( rotVal < 0 ) {
        rotVal = 0;
      }
    }
    else {
      rotVal++;
      if ( rotVal > 127 ) {
        rotVal = 127;
      }
    }
    MIDImessage(prgmChg, rotVal, 0);
    number = rotVal;
    for (int i = 0; i < NUM_OF_DIGITS; i++)
    {
      digit_data[i] = number % 10;
      number /= 10;
    }
    delay(200);

  }
  clkLast = clkState;

  //gestion bouton
  swState = digitalRead(swPin);
  if (swState == LOW && swLast == HIGH) {
    delay(100);//debounce
  }
  swLast = swState;
}
Una vez tenida en cuenta la modificación del aparato, su valor se visualiza en el módulo 7 Segmento.
void Display(int id, unsigned char num)
{
  digitalWrite(latch, LOW);
  shiftOut(data, cs, MSBFIRST, table[num]);
  digitalWrite(latch, HIGH);
  for (int j = 0; j < NUM_OF_DIGITS; j++) digitalWrite(dPins[j], LOW);
  digitalWrite(dPins[id], HIGH);
}

void updateDigits() {
  for (int j = 0; j < NUM_OF_DIGITS; j++){
    Display(j, digit_data[j]);
    delay(2);
  }
}
Por último, volvemos a la función que nos permite enviar mensajes MIDI
void MIDImessage(byte command, byte MIDInote, byte MIDIvelocity) {
  Serial.write(command);//send note on or note off command
  Serial.write(MIDInote);//send pitch data
  if (command == noteON || command == noteOFF) {
    Serial.write(MIDIvelocity);//send velocity data
  }
}
Sólo queda enviar el mensaje cuando se pulse un botón
void readAbtn() { /* function readAbtn */
  //// Read button states from keypad
  btnId = getABtn();
  if (btnId) {
    if (lastBtnId != btnId) {
      MIDImessage(noteOFF, pitches[lastBtnId - 1], velocity);
    }
    MIDImessage(noteON, pitches[btnId - 1], velocity); //turn note on
    lastBtnId = btnId;
  }
}
Código MIDIbox completo
byte velocity = 50;//velocity of MIDI notes, must be between 0 and 127
byte noteON = 144;// = 10010000 , Note On
byte noteOFF = 128;// = 10000000 , Note Off
byte pitchBend = 224; // = 11100000, Pitch Bender Change
byte polyKey = 160; // = 10100000, Polyphonic Key Pressure
byte overallPr = 208; // = 11010000, Overall Pressure
byte prgmChg = 192; // = 11000000, Program Change
byte ctrlChg = 176; // = 10110000,  Control Change

//Keypad
#define nbABtn 16
const int abtnPin = A1;
const int valThresh[nbABtn] = {1000, 900, 820, 750, 660, 620, 585, 540, 500, 475, 455, 425, 370, 300, 260, 200};
const int pitches[nbABtn] = {50, 52, 54, 56, 58, 60, 62, 64, 66, 68, 70, 72, 74, 76, 78, 80 };
bool btnPressed = false;

//Potentiometer
const int potPin = A0; // Pin connected to sensor
int velVal = 0, oldVel = 0; // Analog value from the sensor

//rotary var
const int clkPin  = 53;
const int dtPin  = 51;
const int swPin  = 49;
int rotVal  = 0, btnId = 0, lastBtnId = 0;
bool clkState  = LOW;
bool clkLast  = HIGH;
bool swState  = HIGH;
bool swLast  = HIGH;

//4x7Segment
#define NUM_OF_DIGITS 4
int latch = 4; //74HC595  pin 9 STCP
int cs = 5; //74HC595  pin 10 SHCP
int data = 3; //74HC595  pin 8 DS
int dPins[4] = {8, 9, 10, 11};
//  DP G F E D C B A
//0: 1 1 0 0 0 0 0 0 0xc0
//1: 1 1 1 1 1 0 0 1 0xf9
//2: 1 0 1 0 0 1 0 0 0xa4
//3: 1 0 1 1 0 0 0 0 0xb0
//4: 1 0 0 1 1 0 0 1 0x99
//5: 1 0 0 1 0 0 1 0 0x92
//6: 1 0 0 0 0 0 1 0 0x82
//7: 1 1 1 1 1 0 0 0 0xf8
//8: 1 0 0 0 0 0 0 0 0x80
//9: 1 0 0 1 0 0 0 0 0x90
unsigned char table[] =
{0xc0, 0xf9, 0xa4, 0xb0, 0x99, 0x92, 0x82, 0xf8, 0x80, 0x90};
int digit_data[NUM_OF_DIGITS] = {0};
unsigned int number = 0;
unsigned long previousUpdate = 0, updateTime = 200;

void setup() {
  Serial.begin(115200);
  pinMode(potPin, INPUT);

  pinMode(clkPin, INPUT);
  pinMode(dtPin, INPUT);
  pinMode(swPin, INPUT_PULLUP);

  pinMode(latch, OUTPUT);
  pinMode(cs, OUTPUT);
  pinMode(data, OUTPUT);
  for (int j = 0; j < NUM_OF_DIGITS; j++) pinMode(dPins[j], OUTPUT);
}

void loop() {
  readRotary();
  updateDigits();
  readAbtn();
  readPot();
}

void MIDImessage(byte command, byte MIDInote, byte MIDIvelocity) {
  Serial.write(command);//send note on or note off command
  Serial.write(MIDInote);//send pitch data
  if (command == noteON || command == noteOFF) {
    Serial.write(MIDIvelocity);//send velocity data
  }
}


void readAbtn() { /* function readAbtn */
  //// Read button states from keypad
  btnId = getABtn();
  if (btnId) {
    if (lastBtnId != btnId) {
      MIDImessage(noteOFF, pitches[lastBtnId - 1], velocity);
    }
    MIDImessage(noteON, pitches[btnId - 1], velocity); //turn note on
    lastBtnId = btnId;
  }
}

int getABtn() { /* function getABtn */
  //// Read button states from keypad
  int val = analogRead(abtnPin);
  if (val <= 200) {
    return 0;
  } else {
    for (int i = 0; i < 16; i++) {
      if (val > valThresh[i]) {
        delay(100);
        return i + 1;
      }
    }
  }
}

//Potentiometer
void readPot(){
  velVal = map(int(analogRead(potPin) / 10) * 10, 0, 1023, 0, 127);
  if (oldVel != velVal) {
    //Serial.println(velVal);
    velocity = velVal;
  }
  oldVel = velVal;
}

//7Segment
void Display(int id, unsigned char num)
{
  digitalWrite(latch, LOW);
  shiftOut(data, cs, MSBFIRST, table[num]);
  digitalWrite(latch, HIGH);
  for (int j = 0; j < NUM_OF_DIGITS; j++) digitalWrite(dPins[j], LOW);
  digitalWrite(dPins[id], HIGH);
}

void updateDigits() {
  for (int j = 0; j < NUM_OF_DIGITS; j++)
  {
    Display(j, digit_data[j]);
    delay(2);
  }
}

//rotary
void readRotary( ) { /* function readRotary */
  ////Test routine for Rotary
  // gestion position
  clkState = digitalRead(clkPin);
  if ((clkLast == LOW) && (clkState == HIGH)) {//rotary moving
    if (digitalRead(dtPin) == HIGH) {
      rotVal = rotVal - 1;
      if ( rotVal < 0 ) {
        rotVal = 0;
      }
    }
    else {
      rotVal++;
      if ( rotVal > 127 ) {
        rotVal = 127;
      }
    }
    MIDImessage(prgmChg, rotVal, 0);
    number = rotVal;
    for (int i = 0; i < NUM_OF_DIGITS; i++)
    {
      digit_data[i] = number % 10;
      number /= 10;
    }
    delay(200);

  }
  clkLast = clkState;

  //gestion bouton
  swState = digitalRead(swPin);
  if (swState == LOW && swLast == HIGH) {
    delay(100);//debounce
  }
  swLast = swState;
}
Resultados
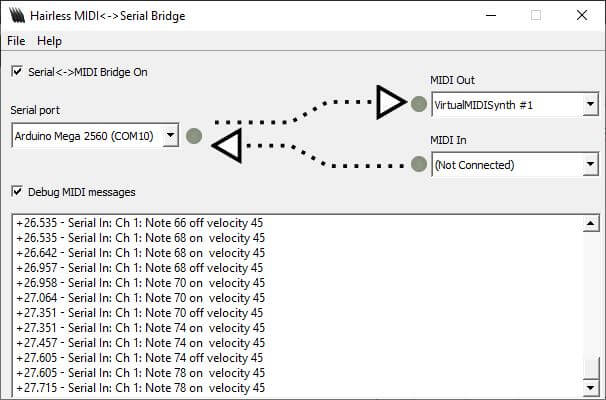
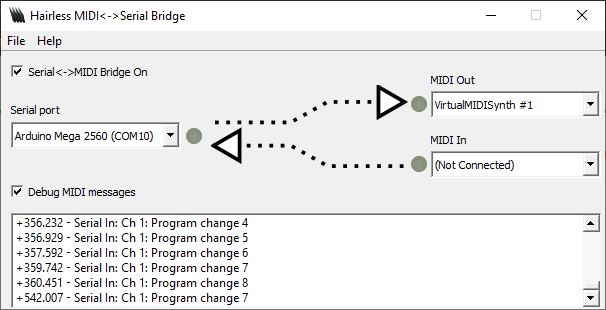
Para probar el código, es necesario abrir los programas hairless y VirtualMIDISynth como se describe en este artículo.
Si todo está configurado correctamente, deberías oír sonidos procedentes de tu ordenador cuando pulses las teclas del teclado.
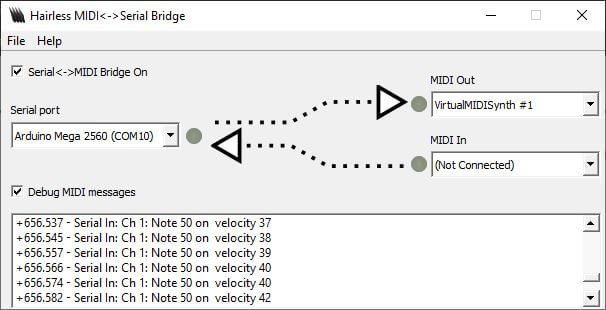
También puedes cambiar la velocidad de la nota tocando el potenciómetro.
Entre dos notas tocadas, puedes seleccionar otro instrumento sintetizador con el codificador giratorio.
Próximos pasos
- Uso de LED o botones iluminados
- Gestión MIDI In para encender los LEDs
- Uso de una pantalla OLED para un menú más completo


