In this tutorial, we’ll look at how to perform object recognition with Yolo and OpenCV, using a neural network pre-trained with deep learning.
We saw in a previous tutorial how to recognize simple shapes using computer vision. This method only works for certain predefined simple shapes. If you want to recognize a wider variety of objects, the easiest way is to use artificial intelligence.
Hardware
- A computer with a Python3 installation
- A camera
Principle
Artificial intelligence is a field of computer science in which the program itself learns to perform certain tasks. Visual recognition in particular. In this tutorial, we’ll use a trained neural network to recognize particular shapes.
You need a lot of data to train a neural network properly. It has been shown that learning is faster on a neural network trained for something else. For example, a neural network trained to recognize dogs will train more easily to recognize cats.
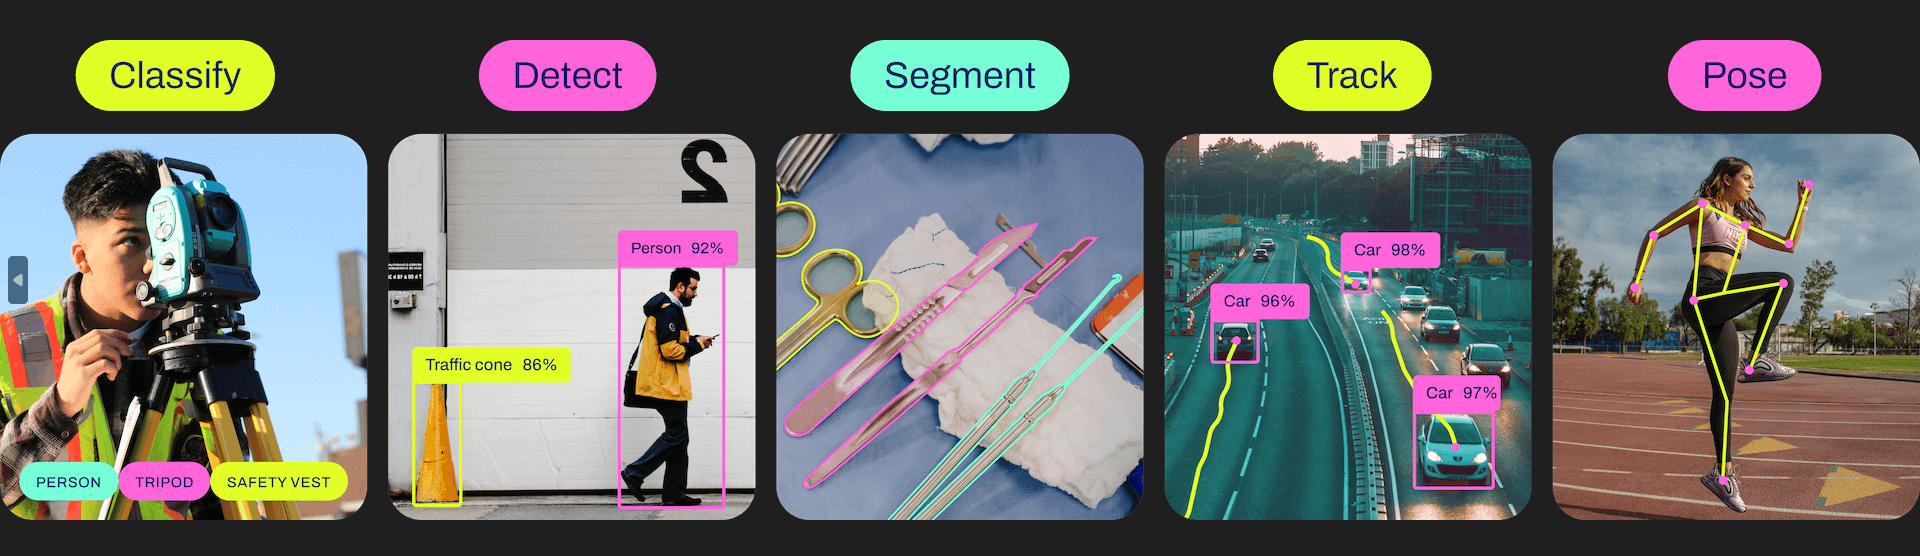
Ultralytics offers YOLO models, which are easy to use and quite effective for detection, classification and tracking.
For each version, there are different models, from the lightest and least powerful to the most powerful but heaviest.
| YOLOv5n | YOLOv5s | YOLOv5m | YOLOv5l | YOLOv5x |
| YOLOv8n | YOLOv8s | YOLOv8m | YOLOv8l | YOLOv8x |
Python configuration
If not, you can download and install Python 3
You can then install the necessary libraries imutils, OpenCV, ultralytics
python3 -m pip install imutils opencv-python ultralytics
Retrieving a pre-trained model
You can retrieve a pre-trained model from the pyhton script
# load the pre-trained YOLOv8n model
model = YOLO("yolov8n.pt")
Python script for object recognition
First, we create a video stream (vs) using the imutils library, which will retrieve images from the camera.
vs = VideoStream(src=0, resolution=(1600, 1200)).start()
We initialize a neural network with the model parameters using the YOLO library (yolov5, v8, etc.).
model = YOLO("yolov8n.pt")
Next, we’ll create a loop which, at each iteration, reads the camera image and passes it to the neural network for object detection and recognition.
while True:
	# start time to compute the fps
	start = datetime.datetime.now()

	#ret, frame = video_cap.read()
	#frame = vs.read(); ret=True


	# if there are no more frames to process, break out of the loop
	if not ret:
		break

	# run the YOLO model on the frame
	detections = model(frame)[0]
Finally, the code displays the detection box, recognition probability and position on the image.
	# loop over the detections
	for box in detections.boxes:
		#extract the label name
		label=model.names.get(box.cls.item())

		# extract the confidence (i.e., probability) associated with the detection
		data=box.data.tolist()[0]
		confidence = data[4]

		# filter out weak detections
		if float(confidence) < CONFIDENCE_THRESHOLD:
			continue

		# if the confidence is greater than the minimum confidence
		xmin, ymin, xmax, ymax = int(data[0]), int(data[1]), int(data[2]), int(data[3])
		cv2.rectangle(frame, (xmin, ymin) , (xmax, ymax), GREEN, 2)

		#draw confidence and label
		y = ymin - 15 if ymin - 15 > 15 else ymin + 15
		cv2.putText(frame, "{} {:.1f}%".format(label,float(confidence*100)), (xmin, y), cv2.FONT_HERSHEY_SIMPLEX, 0.5, GREEN, 2)
Complete object recognition code with OpenCV and YOLO
#!/usr/bin/env python
# -*- coding: utf-8 -*-
#

import datetime
from ultralytics import YOLO
import cv2
from imutils.video import VideoStream
#from helper import create_video_writer


# define some constants
CONFIDENCE_THRESHOLD = 0.8
GREEN = (0, 255, 0)


# load the pre-trained YOLOv8n model
model = YOLO("yolov8n.pt")
#model = YOLO("yolov5n.pt")
"""
#detect on image
frame= cv2.imread('./datasets/two-boats.jpg');ret= True #from image file
detections = model(frame)[0]
# loop over the detections
#for data in detections.boxes.data.tolist():
for box in detections.boxes:
	#extract the label name
	label=model.names.get(box.cls.item())

	# extract the confidence (i.e., probability) associated with the detection
	data=box.data.tolist()[0]
	confidence = data[4]

	# filter out weak detections by ensuring the
	# confidence is greater than the minimum confidence
	if float(confidence) < CONFIDENCE_THRESHOLD:
		continue

	# if the confidence is greater than the minimum confidence,
	# draw the bounding box on the frame
	xmin, ymin, xmax, ymax = int(data[0]), int(data[1]), int(data[2]), int(data[3])
	cv2.rectangle(frame, (xmin, ymin) , (xmax, ymax), GREEN, 2)

	#draw confidence and label
	y = ymin - 15 if ymin - 15 > 15 else ymin + 15
	cv2.putText(frame, "{} {:.1f}%".format(label,float(confidence*100)), (xmin, y), cv2.FONT_HERSHEY_SIMPLEX, 0.5, GREEN, 2)

# show the frame to our screen
cv2.imshow("Img", frame)
"""
#detect on video
# initialize the video capture object
#vs = VideoStream(src=0, resolution=(1600, 1200)).start()
video_cap = cv2.VideoCapture("datasets\\Splash - 23011.mp4")
# initialize the video writer object
#writer = create_video_writer(video_cap, "output.mp4")

while True:
	# start time to compute the fps
	start = datetime.datetime.now()

	#ret, frame = video_cap.read()
	#frame = vs.read(); ret=True


	# if there are no more frames to process, break out of the loop
	if not ret:
		break

	# run the YOLO model on the frame
	detections = model(frame)[0]

	# loop over the detections
	#for data in detections.boxes.data.tolist():
	for box in detections.boxes:
		#extract the label name
		label=model.names.get(box.cls.item())

		# extract the confidence (i.e., probability) associated with the detection
		data=box.data.tolist()[0]
		confidence = data[4]

		# filter out weak detections by ensuring the
		# confidence is greater than the minimum confidence
		if float(confidence) < CONFIDENCE_THRESHOLD:
			continue

		# if the confidence is greater than the minimum confidence,
		# draw the bounding box on the frame
		xmin, ymin, xmax, ymax = int(data[0]), int(data[1]), int(data[2]), int(data[3])
		cv2.rectangle(frame, (xmin, ymin) , (xmax, ymax), GREEN, 2)

		#draw confidence and label
		y = ymin - 15 if ymin - 15 > 15 else ymin + 15
		cv2.putText(frame, "{} {:.1f}%".format(label,float(confidence*100)), (xmin, y), cv2.FONT_HERSHEY_SIMPLEX, 0.5, GREEN, 2)
		#cv2.circle(frame, (int(X)-15, int(Y)), 1, GREEN, 2)
		#cv2.putText(frame, poslbl, (int(X), int(Y)),cv2.FONT_HERSHEY_SIMPLEX, 0.5, GREEN, 2)

	# end time to compute the fps
	end = datetime.datetime.now()
	# show the time it took to process 1 frame
	total = (end - start).total_seconds()
	print(f"Time to process 1 frame: {total * 1000:.0f} milliseconds")

	# calculate the frame per second and draw it on the frame
	fps = f"FPS: {1 / total:.2f}"
	cv2.putText(frame, fps, (50, 50),
				cv2.FONT_HERSHEY_SIMPLEX, 2, (0, 0, 255), 4)

	# show the frame to our screen
	cv2.imshow("Frame", frame)
	#writer.write(frame)
	if cv2.waitKey(1) == ord("q"):
		break

video_cap.release()
vs.stop()
#writer.release()
cv2.destroyAllWindows()
Image sources for object detection
You can use this script with different image sources. To do so, you’ll need to adapt the previous code slightly to modify the “img” variable containing the image to be analyzed.
- Your computer’s webcam
vs = VideoStream(src=0, resolution=(1600, 1200)).start()
while True:
	frame = vs.read()
The video stream must be stopped at the end of the script with vs.stop()
- Une caméra IP
vc = cv2.VideoCapture('rtsp://user:password@ipaddress:rtspPort')
while True:
	ret, frame=vc.read() #from ip cam
Make sure to stop video capture at the end of the script with vc.release()
- Raspberry Pi Picam
vs = VideoStream(usePiCamera=True, resolution=(1600, 1200)).start()
while True:
	frame = vs.read()
Remember to stop the stream at the end of the script with vs.stop()
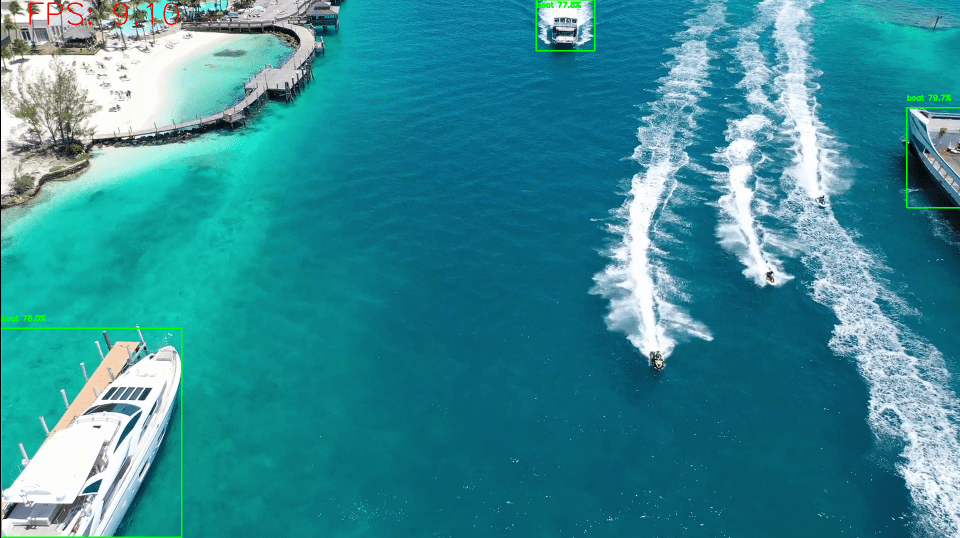
- A video file
vc = cv2.VideoCapture('./datasets/Splash - 23011.mp4') #from video
while True:
	ret, frame=vc.read() #from video
- An image file
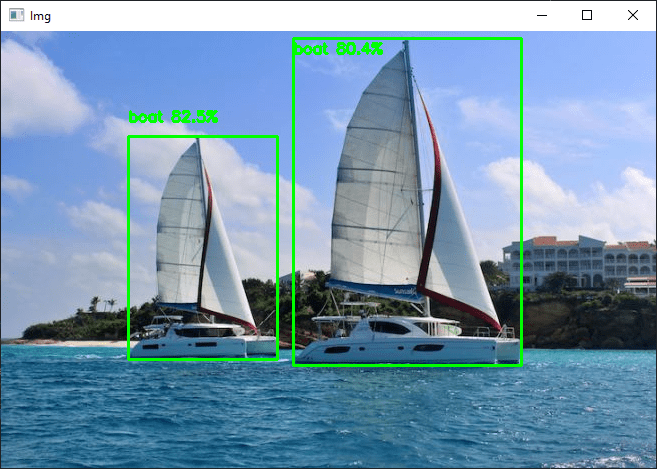
frame= cv2.imread('./datasets/two-boats.jpg')
Results
In this example, we send the neural network an image of two boats, which are correctly recognized. To obtain slightly different results, you can modify the confidence parameter to avoid false positives.
You can test this code with your webcam or with photos, for example, to see how the model and object recognition perform.
Once your script is up and running, you can train your model to detect other objects.


