Cada computadora está equipada con un reloj interno de tiempo real que le permite conocer la fecha. Los microcontroladores tipo Arduino no tienen RTC. El módulo DS3231 le da al Arduino la capacidad de calcular la fecha, permitiéndole controlar el tiempo con más precisión.

Hardware
- Computadora
- Arduino UNO
- Cable USB A macho a B macho
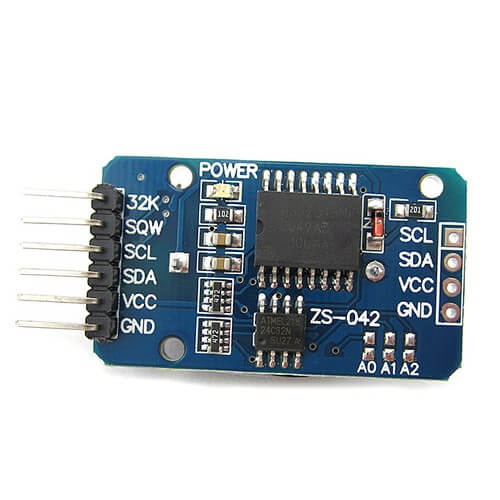
- Reloj en tiempo real DS3231
Principio de funcionamiento
Un módulo de reloj en tiempo real suele estar equipado con un oscilador de cuarzo para medir la hora y una batería para almacenar la hora incluso cuando la fuente de alimentación principal está apagada.
Esquema
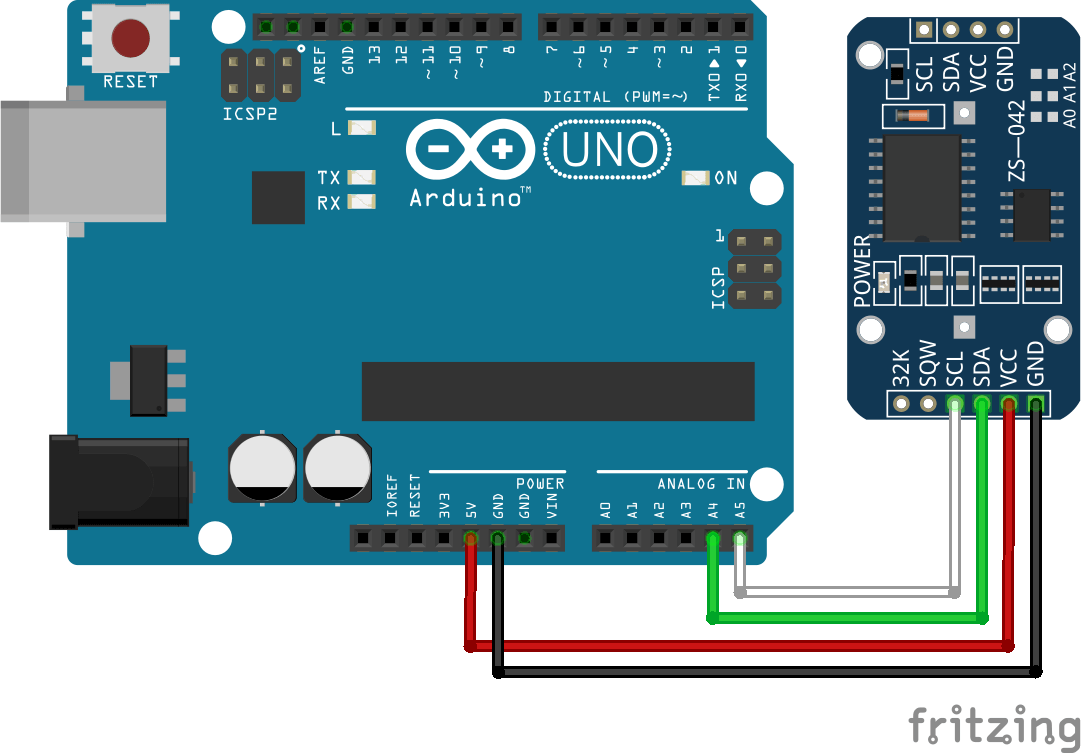
El módulo DS3231 utiliza la comunicación I2C para interactuar con el microcontrolador. Así que lo conectamos:
- SDA a la pin A4
- SCL a la pin A5
- VCC a la pin 5V
- GND a la pin GND

Código
Para comunicar con el módulo DS3231, utilizamos la biblioteca DS3231.h que debe ser instalada en el administrador de la biblioteca. Cuando se usa por primera vez o se cambia la pila, la hora y la fecha no se ajustan. En el siguiente código, la fecha se puede establecer introduciendo la fecha deseada en el monitor de serie como YYMMDDwHHMMSSx. Una vez introducida la fecha, deberá reiniciar el tablero para que el módulo la tenga en cuenta.
Una vez que el reloj esté en la fecha correcta, puedes quitar la parte del código setDate y getDateStuff.
//Libraries
#include <Wire.h>//https://www.arduino.cc/en/reference/wire
#include <DS3231.h>//https://github.com/NorthernWidget/DS3231

//Variables
byte Year ;
byte Month ;
byte Date ;
byte DoW ;
byte Hour ;
byte Minute ;
byte Second ;
bool Century  = false;
bool h12 ;
bool PM ;

//Objects
DS3231 Clock;

void setup() {
  //Init Serial USB
  Serial.begin(9600);
  Serial.println(F("Initialize System"));
  Wire.begin();
}

void loop() {
  setDate();
  readRTC();
}

void readRTC( ) { /* function readRTC */
  ////Read Real Time Clock
  Serial.print(Clock.getYear(), DEC);
  Serial.print("-");
  Serial.print(Clock.getMonth(Century), DEC);
  Serial.print("-");
  Serial.print(Clock.getDate(), DEC);
  Serial.print(" ");
  Serial.print(Clock.getHour(h12, PM), DEC); //24-hr
  Serial.print(":");
  Serial.print(Clock.getMinute(), DEC);
  Serial.print(":");
  Serial.println(Clock.getSecond(), DEC);
  delay(1000);
}

void setDate( ) { /* function setDate */
  ////Set Real Time Clock
  if (Serial.available()) {

    //int _start = millis();

    GetDateStuff(Year, Month, Date, DoW, Hour, Minute, Second);

    Clock.setClockMode(false);  // set to 24h

    Clock.setSecond(Second);
    Clock.setMinute(Minute);
    Clock.setHour(Hour);
    Clock.setDate(Date);
    Clock.setMonth(Month);
    Clock.setYear(Year);
    Clock.setDoW(DoW);

  }
}

void GetDateStuff(byte& Year, byte& Month, byte& Day, byte& DoW, byte& Hour, byte& Minute, byte& Second) { /* function GetDateStuff */
  ////Get date data
  // Call this if you notice something coming in on
  // the serial port. The stuff coming in should be in
  // the order YYMMDDwHHMMSS, with an 'x' at the end.
  boolean GotString = false;
  char InChar;
  byte Temp1, Temp2;
  char InString[20];

  byte j = 0;
  while (!GotString) {
    if (Serial.available()) {
      InChar = Serial.read();
      InString[j] = InChar;
      j += 1;
      if (InChar == 'x') {
        GotString = true;
      }
    }
  }
  Serial.println(InString);
  // Read Year first
  Temp1 = (byte)InString[0] - 48;
  Temp2 = (byte)InString[1] - 48;
  Year = Temp1 * 10 + Temp2;
  // now month
  Temp1 = (byte)InString[2] - 48;
  Temp2 = (byte)InString[3] - 48;
  Month = Temp1 * 10 + Temp2;
  // now date
  Temp1 = (byte)InString[4] - 48;
  Temp2 = (byte)InString[5] - 48;
  Day = Temp1 * 10 + Temp2;
  // now Day of Week
  DoW = (byte)InString[6] - 48;
  // now Hour
  Temp1 = (byte)InString[7] - 48;
  Temp2 = (byte)InString[8] - 48;
  Hour = Temp1 * 10 + Temp2;
  // now Minute
  Temp1 = (byte)InString[9] - 48;
  Temp2 = (byte)InString[10] - 48;
  Minute = Temp1 * 10 + Temp2;
  // now Second
  Temp1 = (byte)InString[11] - 48;
  Temp2 = (byte)InString[12] - 48;
  Second = Temp1 * 10 + Temp2;
}
Resultado
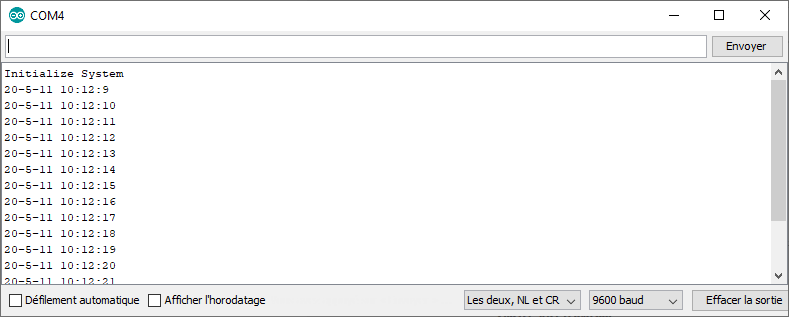
Una vez que se han inicializado la hora y la fecha y se ha reiniciado la tarjeta, la fecha se muestra cada segundo. Se ha añadido la función delay() para simplificar la visualización en el monitor de serie. En la práctica, no necesitará la función de retardo cuando utilice el módulo ds3231.

Aplicaciones
- Hacer un despertador con Arduino
Fuentes
Encuentre otros tutoriales y ejemplos en el generador de código automático
Arquitecto de Código


Buenas. Le felicito por sus aportes y le animo a que siga publicando.
No consigo puntuar sus trabajos porque el sistema dice WP no valido. Lo siento.
saludos
Hola, siempre eme sale la misma hora y fecha repetidamente: 1/1/0 0:0:81. ¿ Alguna solución ?
Hola,
la prima vez, debe establecer la fecha deseada con el monitor de serie como YYMMDDwHHMMSSx